Quantcast
Channel: Viget Articles
Viewing all 1272 articles
Browse latest View live

150 Digital Project Managers Walk Into A Room…

$
0
0

No, it’s not the start of an amazingly funny joke (though I’m sure many of you could come up with a pretty good punchline). It’s actually how the inaugural Digital Project Manager Summit began.

Digital Project Management Summit 2013
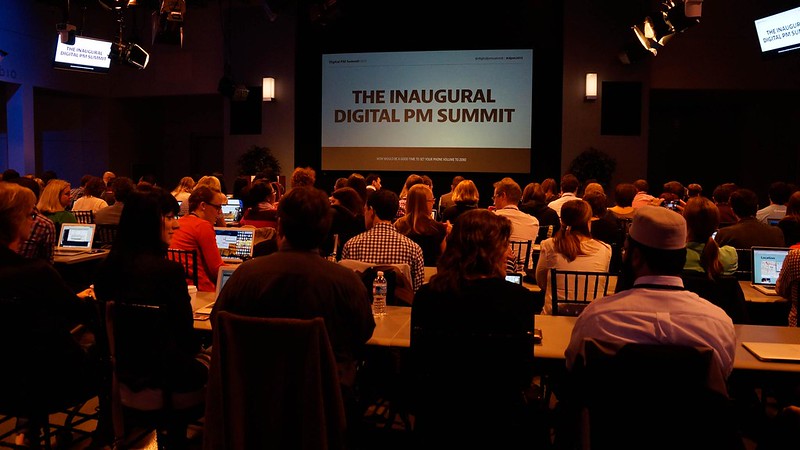
Photo by Jeffrey Zeldman. View all Digital Project Summit 2013 images here.


On October 14th, approximately 150 Project Managers walked through the historic halls of WHYY Studios, Philadelphia’s legendary radio station, to participate in the first event of its kind. It was a two-day conference that was a mix of single track and choose your own adventure presentations with eight speakers presenting to the whole group and four hours of breakout sessions. Prior to the conference, attendees were able to rate their interest in various breakout sessions and were placed accordingly with a maximum of fifty people per breakout session. That process seemed to work out well as breakout sessions were evenly attended and, from conversations I had with attendees, it felt like most people were placed in one of their top 2 choices.

Viget sent four Project Managers  (Amanda, Josh, Samantha, and myself) to the summit, and I think we all went in with our own expectations and left with our own takeaways. Below, you will find our high-level takeaways and feedback. We usually try to share thoughts within a week after attending events but, in this case, we decided to hold off for about a month to see what sank in and truly made an impression on us.

While the talks and sessions resonated differently with each of us who attended, there were a few takeaways I think we all left with: the universal acceptance of the importance of soft skills in a PM; the positive influence of putting ourselves in the client’s shoes; and the need for conflicting personality types on successful projects.

Soft Skills

It’s great to see that other agencies value soft skills as much as Viget does. Being a Digital PM is NOT all spreadsheets and scheduling. There are nuances. For example, being able to be productive with a variety of people and teams is a must, as many speakers discussed. Nancy Lyons and Meghan Wilker, CEO and COO respectively, of Clockwork Active Media, did a great job of describing this in their “Interactive PM Survival Guide” talk. They focused on the need for a PM to have great emotional intelligence, and what that really looks like in real life. A favorite quote of mine from their talk was “Project Management is like air quality. If you can see it, it’s probably killing you.” That doesn’t necessarily make me feel all warm and fuzzy, but I do think it’s spot on.

Rachel Gertz, Project Manager at nGen Works, also emphasized the soft skills needed by PMs. In her talk, “Clients Matter, So Put Your Teams First,” she focused on the idea that you “teach people how to treat you.” A PM needs to know how to build relationships that result in the client trusting the PM and the team. This goes far beyond building schedules and scheduling meetings. It requires knowing when to be firm, when to push back, when to step back, and everything in between. It requires the soft skills that many digital agencies are clearly (and thankfully) emphasizing.

Understanding the Client

The presentation that resonated with me most was from Sam Barnes, Development Team Manager at Global Personals. He gave a talk entitled “Vice Versa Client Management,” which detailed his experiences of being a client after years of being a PM. He learned a lot of things by being on the other side, and I felt he offered very practical lessons that we can all learn from. We should never assume that clients understand our language, process, or deliverables without detailed explanations. We also should never forget that, in most cases, the project we are working on is not anywhere close to their only responsibility. They are busy, at some point we “will likely force a client to ruffle feathers (sometimes important feathers) internally,” and they are getting opinions from everywhere. Being a client is hard, and that should be in the front of our minds as we move through a project.

Embracing Conflicting Personalities

The last speaker of the conference was Michael Lopp, Director of Engineering at Palantir. Everything he spoke about in his talk “Stables & Volatiles,” including his experiences with Apple Inc. running store.apple.com, focused on the presence and need for two personality types—volatiles and stables. Volatiles are disrupters that get things done, but might not get them done in the way that’s expected of them. Stables love following the rules and expectations, and are not as interested in shaking things up. Though he spoke mostly about companies as a whole, I think his message can be translated to project teams as well; in order for a team to be successful, it needs the presence of these two personalities. They might conflict sometimes, but they both have their strengths and weaknesses and it’s their ability to balance each other out than can drive success. It’s important for PMs to understand and recognize these personality types within the team, and make sure everyone is in a position to do their best work.

Feedback

As mentioned at the start of this recap, DPM2013 was the first ever Digital Project Management Summit. The team at Happy Cog that put on the Summit clearly drew on what they’ve learned when putting together other conferences, and created a conference that was relevant, valuable, and one that operated smoothly. If there is one thing I’d like to see changed for DPM2014, it’s how in-depth the talks and sessions go into their topics.

Many speakers seemed to make broad statements, support them with a few high-level points, and then moved on to the next statement. These broad statements were spot on and relevant but, ultimately, they were too high-level to be actionable. I loved how much of the advice from the presenters hit on some core truths about project management (“be patient, “tackle the hard conversations immediately”), but, at the same time, those were things I got the feeling most people in the room already knew and believed in. Next time, I would love it if some of the presenters provided a shorter list of points that were REALLY dug into. When talking to a room that really gets it, specifics will often be more tangible and impactful than quick, high-level points.

I noticed the same tendency towards generalizations in many of the breakout sessions as well. The topics of the breakout sessions were extremely relevant, but many of them ended up being relatively unstructured discussions among attendees, which led to mostly high-level talks. One takeaway for me, then, was that these types of discussion-based sessions might be better-suited as panels, or better prepped by having attendees fill out a questionnaire ahead of time so the sessions could have been more focused.

Of course, hindsight is 20-20. With this being the first ever DPM Summit, it would have been impossible to know how in-depth to go with talks and sessions, since it would be impossible to know what experience each attendee was coming to the table with. I would agree that, for a first-time conference, it’s probably wisest to err on the side of high-level discussion. Getting too much into the weeds could risk losing a lot of people.

Final Thoughts

All in all, attending DPM2013 was very valuable, and I plan to attend DPM2014. Beyond the high quality and relevance of the talks, it was simply fantastic getting to know and hang out with other digital project managers. The spirit of connecting and building a community was strong, and something I want to help continue in 2014.

Did you attend DPM2013? What were your thoughts and takeaways?


Write You a Parser for Fun and Win

$
0
0

As a software developer, you’re probably familiar with the concept of a parser, at least at a high level. Maybe you took a course on compilers in school, or downloaded a copy of Create Your Own Programming Language, but this isn’t the sort of thing many of us get paid to work on. I’m writing this post to describe a real-world web development problem to which creating a series of parsers was the best, most elegant solution. This is more in-the-weeds than I usually like to go with these things, but stick with me – this is cool stuff.

The Problem

Our client, the Chronicle of Higher Education, hired us to build Vitae, a series of tools for academics to find and apply to jobs, chief among which is the profile, an online résumé of sorts. I’m not sure when the last time you looked at a career academic’s CV was, but these suckers are long, packed with degrees, publications, honors, etc. We created some slick Backbone-powered interactions for creating and editing individual items, but a user with 70 publications still faced a long road to create her profile.

Since academics are accustomed to following well-defined formats (e.g. bibliographies), KV had the idea of creating formats for each profile element, and giving users the option to create and edit all their data of a given type at once, as text. So, for example, a user might enter his degrees in the following format:

Duke University
; Ph.D.; Biomedical Engineering

University of North Carolina
2010; M.S.; Biology
2007; B.S.; Biology

That is to say, the user has a bachelor’s and a master’s in Biology from UNC, and is working on a Ph.D. in Biomedical Engineering at Duke.

The Solution

My initial, naïve approach to processing this input involved splitting it up by line and attempting to suss out what each line was supposed to be. It quickly became apparent that this was untenable for even one model, let alone the 15+ that we eventually needed. Chris suggested creating custom parsers for each resource, an approach I’d initially written off as being too heavy-handed for our needs.

What is a parser, you ask? According to Wikipedia, it’s

a software component that takes input data (frequently text) and builds a data structure – often some kind of parse tree, abstract syntax tree or other hierarchical structure – giving a structural representation of the input, checking for correct syntax in the process.

Sounds about right. I investigated Treetop, the most well-known Ruby library for creating parsers, but I found it to be targeted more toward building standalone tools rather than use inside a larger application. Searching further, I found Parslet, a “small Ruby library for constructing parsers in the PEG (Parsing Expression Grammar) fashion.” Parslet turned out to be the perfect tool for the job. Here, for example, is a basic parser for the above degree input:

class DegreeParser < Parslet::Parser
  root :degree_groups

  rule(:degree_groups)      { degree_group.repeat(0, 1) >>
                              additional_degrees.repeat(0) }

  rule(:degree_group)       { institution_name >>
                              (newline >> degree).repeat(1).as(:degrees_attributes) }

  rule(:additional_degrees) { blank_line.repeat(2) >> degree_group }

  rule(:institution_name)   { line.as(:institution_name) }

  rule(:degree)             { year.as(:year).maybe >>
                              semicolon >>
                              name >>
                              semicolon >>
                              field_of_study }

  rule(:name)               { segment.as(:name) }
  rule(:field_of_study)     { segment.as(:field_of_study) }

  rule(:year)               { spaces >>
                              match("[0-9]").repeat(4, 4) >>
                              spaces }

  rule(:line)               { spaces >>
                              match('[^ \r\n]').repeat(1) >>
                              match('[^\r\n]').repeat(0) }

  rule(:segment)            { spaces >>
                              match('[^ ;\r\n]').repeat(1) >>
                              match('[^;\r\n]').repeat(0) }

  rule(:blank_line)         { spaces >> newline >> spaces }
  rule(:newline)            { str("\r").maybe >> str("\n") }
  rule(:semicolon)          { str(";") }
  rule(:space)              { str(" ") }
  rule(:spaces)             { space.repeat(0) }
end

Let’s take this line-by-line:

2: the root directive tells the parser what rule to start parsing with.

4-5: degree_groups is a Parslet rule. It can reference other rules, Parslet instructions, or both. In this case, degree_groups, our parsing root, is made up of zero or one degree_group followed by any number of additional_degrees.

7-8: a degree_group is defined as an institution name followed by one more more newline + degree combinations. The .as method defines the keys in the resulting output hash. Use names that match up with your ActiveRecord objects for great justice.

10: additional_degrees is just a blank line followed by another degree_group.

12: institution_name makes use of our line directive (which we’ll discuss in a minute) and simply gives it a name.

14-18: Here’s where a degree (e.g. “1997; M.S.; Psychology”) is defined. We use the year rule, defined on line 23 as four digits in a row, give it the name “year,” and make it optional with the .maybe method. .maybe is similar to the .repeat(0, 1) we used earlier, the difference being that the latter will always put its results in an array. After that, we have a semicolon, the name of the degree, another semicolon, and the field of study.

20-21: name and field_of_study are segments, text content terminated by semicolons.

23-25: a year is exactly four digits with optional whitespace on either side.

27-29: a line (used here for our institution name) is at least one non-newline, non-whitespace character plus everything up to the next newline.

31-33: a segment is like a line, except it also terminates at semicolons.

35-39: here we put names to some literal string matches, like semicolons, spaces, and newlines.

In the actual app, the common rules between parsers (year, segment, newline, etc.) are part of a parent class so that only the resource-specific instructions would be included in this parser. Here’s what we get when we pass our degree info to this new parser:

[{:institution_name=>"Duke University"@0,
  :degrees_attributes=>
   [{:name=>" Ph.D."@17, :field_of_study=>" Biomedical Engineering"@24}]},
 {:institution_name=>"University of North Carolina"@49,
  :degrees_attributes=>
   [{:year=>"2010"@78, :name=>" M.S."@83, :field_of_study=>" Biology"@89},
    {:year=>"2007"@98, :name=>" B.S."@103, :field_of_study=>" Biology"@109}]}]

The values are Parslet nodes, and the @XX indicates where in the input the rule was matched. With a little bit of string coercion, this output can be fed directly into an ActiveRecord model. If the user’s input is invalid, Parslet makes it similarly straightforward to point out the offending line.


This component of Vitae was incredibly satisfying to work on, because it solved a real-world issue for our users while scratching a nerdy personal itch. I encourage you to learn more about parsers (and Parslet specifically) and to look for ways to use them in projects both personal and professional.

BEM, Multiple Modifiers, and Experimenting with Attribute Selectors

$
0
0

The FEDs here at Viget love using BEM syntax for our CSS. It enables us to adhere to an expressive naming convention which helps in hand-offs, code reviews, and just coding faster. However, the more abstract a design becomes, the more you need multiple modifiers for a single design element. You can apply each specific modifier, but that can quickly become unwieldy.

Note: If you’re not familiar with the BEM naming convention, I strongly suggest taking a look at Harry Roberts' post on the matter.

How We Currently Do Multiple Modifiers

If we wanted to apply multiple modified styles of a block element—let's say a button—our markup would have to look like this.

<button class="button button--blue button--large button--rounded">I’m a button!</button>

There's nothing wrong with this markup, but it does suffer from being anti-DRY. We know that, when we apply the BEM syntax, a modifier starts with "--". Rewriting "button" each time seems unnecessarily verbose. Luckily, attribute selectors can help.

Chaining Attribute Selectors

Thanks to the long supported CSS attribute selectors, we can extend the use of BEM even further to allow for multiple selectors. How so? Take the example below:

[class^="button"][class*="--blue"] {
    background: #00f;
}

The above CSS looks for an element that starts with a class of button that also contains --blue. An example of what this CSS rule would target is:

<button class="button--blue">I’m a button!</button>

Taking It Further

Let’s get a little more creative and apply this to a more complex real world scenario. Let’s say I had multiple modifiers (as I often do for buttons) applied to a single element like so:

<button class="button--blue--large--rounded">I’m a button!</button>

I could target this and apply the “blue”, “large”, and “rounded” styles to this button using the follow.

[class^="button"] {
    padding: 1em 2em;
}

[class^="button"][class*="--blue"] {
    background: #00f;
}

[class^="button"][class*="--large"] {
    font-size: 36px
}

[class^="button"][class*="--rounded"] {
    border-radius: 10px;
}

That’s pretty ugly to read and a pain to write. But with the help of the newest version of SASS we can use a custom mixin we can clean it up a bit:

/* Multiple Modifier */
@mixin mm($modifier) {
    $len: str-length(#{&}); /* Get parent string length */
    $parent: str-slice(#{&}, 2, $len); /* Remove leading . */

    @at-root [class^="#{$parent}"][class*="--#{$modifier}"] {
        @extend .#{$parent};
        @content;
    }
}

We can then write:

.button {
    padding: 1em 2em;
   
    @include mm(blue) {
        background: #00f;
    }
   
    @include mm(large) {
        font-size: 36px;
    }
   
    @include mm(rounded) {
        border-radius: 10px;
    }
}

The mm mixin grabs grabs the passed parameter and appends it to the parent with a "begins with" selector which then generates equivalent CSS. Click here for proof.

Drawbacks

Like any new technology or experiment, there are a couple drawbacks, most notably:

  1. Attribute Selectors are a little slow (but barely).
  2. You're creating a class name that isn't explicately written anywhere except in the markup, making it harder to debug and track down in your stylesheets.
  3. Additional classes must be added to the end of the class— ie. <button class="button--blue--rounded clearfix"> —since this targets class names using the "starts with" selector.

Should We Do This?

Probably not, though the experiment is cool. My general rule of thumb: if you can’t CMD + F for a class in your pre-processed stylesheets that was output in the markup, then you’ve gone too far. Obviously, for situations like this, I believe it's totally fine. But keep in mind: the further we walk down the path of CSS pre-processors, the more we can blur the line between readible verses maintainable code.

Can you think of other uses for chained attribute selectors? Let us know for great justice in the comments below!

Backbone.js on Vitae

$
0
0

I recently had the chance to work on Vitae, an online network for higher education professionals that features a variety of tools to help users manage career placement and advancement. Among those tools, profiles are probably the largest and most complex. They provide a wide range of flexibility and customization. Users can build profiles from more than a dozen unique sections like Education, Experience, Publications, and Grants. Within each section, they can create, edit, and arrange information about themselves. However they wish to be presented, a Vitae profile can accommodate.

But there's a catch: users are going to need to enter all that data. That can be a real pain.

We attacked the problem on multiple fronts with bulk editing and data importing from external sources. But there was no escape from beefing up the standard web forms. A bunch of page loads could cause too much friction for users to actually use the feature. Interactions had to be simple and clean. Potentially repetitive tasks had to be fast. Succeed, and users will cheer. Fail, and they will curse our names.

In which case, we were going to be writing a lot of JavaScript to power those pages. Code to push and pull data, to display data, and to orchestrate all the pieces. However, our problem domain wasn't really data persistence. Or data-view binding. Or event management. Sure, we needed all those things, but why let them distract us?

Enter Backbone.js! Backbone handled the generic problems so we could focus on making profile interactions fly.

Profile Editor

Let's look at some practices we used to leverage Backbone on Vitae profiles.

Bootstrapping data

This isn't a single-page app, so we weren't going to try to load data on demand once the Backbone kicked in. First, it's totally unnecessary because we have control over what gets rendered from the server. Second, any lag is going to be (painfully) felt by the user.

Don't: serve the page, load Backbone, call back to server for page data
Do: serve the page with embedded data, load Backbone, consume the embedded data into Backbone

We used this pattern extensively for profile editing. In a Rails ERB template:

<section
  class="profile-section--presentations profile-section"
  data-section="<%= section.to_json %>"
  data-resources="<%= current_user.presentations.to_json %>"
>

And consume with JS in a Backbone view:

// Load resources for a section
this.collection = new this.resourceCollection(this.$el.data('resources'));

Views all the way down

It's all about the views. Anything that can be a view, should be a view. It turns out to be a great way to attach behavior to a UI element, even very simple things. Here we see an experience section where the underlying views have been labeled.

Base prototypes

A profile can have a lot of sections, but each section behaves similarly. We made an effort to reduce duplication by introducing a base section prototype.

And section views weren't unique for having duplication. We extracted prototypes for edit modals, document modals, and more.

Error handling

We don't validate any data client side. There are certainly trade-offs, but we felt reducing duplication here was worth an increase in server load.

When a save does fail, we use this code in our base modal view:

saveError: function(model, xhr, options) {
  var errorsArray = $.parseJSON(xhr.responseText).errors;

  this.$errors.html(
    this.errorsTemplate({ errorsArray: errorsArray })
  ).removeClass('visually-hidden');
}

which uses the shared error template:

<ul>
  <% for (var field in errorsArray) { %>
    <% for(var m = 0, n = errorsArray[field].length; m < n; m++) { %>
      <li><%= field.capitalize() + ' ' + errorsArray[field][m] %></li>
    <% } %>
  <% } %>
</ul>

Organization

Profiles weren't the only feature on Vitae to have some rich client enchancements. As the lines of JavaScript started adding up beyond profiles, we took a good, hard look at how to organize the code.

Split concerns into applications

For most projects, it won't do to have one large Backbone application. It's much easier to reason about and modify code that has been split into separate concerns. For Vitae, the features were pretty orthogonal: profile editor, photo editor, messaging, dossier, etc. It was easy to put each in its own directory.

app/assets/javascripts/[feature]

Application layout

Inside each app, we kept a Rails style layout:

  • collections
  • models
  • routers
  • templates
  • views

AMD with Almond

For organizing individual files, we used the AMD pattern with Almond. Almond provides the power of AMD without the full functionality of Require.js. It's a really nice trade-off since Rails asset pipeline is going to package and ship over all the JavaScript for us.

Rails

Rails and Backbone don't see eye to eye on every convention. One particular sticking point: by default Rails will send 204 No Content responses when receiveing a POST or PUT. It's really helpful for Backbone to actually get back the content that was created or updated. We used this handy responder to do just that:

# We don't want 204 No Content responses from the server when we POST or 
# PUT json to the server.  We want the resource data encoded as json.
#
# http://stackoverflow.com/a/10087240
#
module Responders::JsonResponder
  protected

  def api_behavior(error)
    if post?
      display resource, :status => :created
    elsif put?
      display resource, :status => :ok
    else
      super
    end
  end
end

Removing unnecessary flash messages

Rails makes it really easy to let the same controller share HTML and AJAX requests with respond_with. It's a big win for reducing duplication where the behavior would be identical. But what about the flash?

In the case of AJAX requests, we don't want to set a flash message. Doing so can lead to some interesting messages on the next page load. We could perform a check on each individual controller. Gross. We don't want that kind of technical debt. Instead, we just peel off any unnecessay flash messages as part of an after_filter on our application controller.

class ApplicationController < ActionController::Base

  after_filter :clear_flash, :if => :xhr_request?

  private

  def clear_flash
    flash.discard
  end

  def xhr_request?
    request.xhr?
  end
end

Conclusion

Backbone turned out to be a good fit for Vitae. It could handle all the details we didn't need to be concerned with and then get out of the way. It freed our attention to tackle the real problems. And with a little tinkering, it paired nicely with our Rails backend.

Behind the Design: Cheetah Day Poster

$
0
0

In October, the Cheetah Conservation Fund (CCF) asked us to design posters for International Cheetah Day (December 4). The purpose of this event is to spread awareness about the rapid decline and near extinction of cheetahs. To express this important message in a visceral manner, we decided to step away from the computer and use traditional art media.

GOALS

Owen Shifflett thought it would be best to treat this project more like an art piece than a design flyer. We wanted the poster to be iconic, memorable, and recognizable from afar. 

For inspiration, Owen and I looked at several propaganda posters that engaged audiences with a call-to-action. 

Also, Owen showed me some Rembrandt portraits and explained how the subjects in Rembrandt’s paintings evoked emotion simply with their eyes and posture. We thought it would be interesting to have the poster show primarily the cheetah’s face, to emphasize its unique facial markings. For a more memorable look, the color palette was kept minimal with black, white, and yellow/orange colors. Instead of using Photoshop or Illustrator to create the main graphic, we decided to play with graphite, ink, water, and charcoal to achieve a raw and aggressive execution.

ROUGH DRAFTS

To start, I drew several cheetahs from different perspectives with pencil. After choosing the right composition, I drew the same face several times with graphite, ink, water, and charcoal. Out of all of the mediums, charcoal was the best for conveying the type of raw look I wanted.

I drew the cheetah’s black, teardrop-shaped line in a smooth, rough, and somewhat chaotic manner. In some areas, the black line blends in with the image’s shadows and extends to other features of the face.

HAND LETTERING

I chose to do the typography by hand in order to achieve a rough and unadulterated look that would match the visceral quality of the cheetah image. The copy was subject to change, so I decided to do the hand-lettering on separate sheets of paper so that it wouldn’t interfere with the image of the cheetah’s face.

PHOTOSHOP

Once I was satisfied with the drawings, I scanned them onto the computer. The scans were placed into Photoshop where I arranged the different elements together and added color. At first, I placed the typography on the right, but that didn’t allow for much hierarchy and spacing.

IT’S IN THE EYES

I decided to convey a wide variety of strong emotions in the cheetah’s eye. The deep orange value hints at the animal’s pride; deep black values around the eye represent strength and boldness. To draw the viewer’s attention to the eye, the black lines curve inward towards the focal point. Light highlights show vulnerability and a need for help. Adding depth and vibrant colors help make the viewer feel more emotionally drawn to the cause.

MORE REVISIONS

I moved the typography and logo to the left to create breathing room and better composition. To establish hierarchy, I increased the scale of the International Cheetah Day title and date. Key words like “fast” and #SAVETHECHEETAH were emphasized in bold black rectangles. I opted not to smooth out some of my charcoal marks—for example, on the edges of the #SAVETHECHEETAH black rectangles— to hint at the charcoal medium I used and to show roughness.

FINAL PRODUCT

CONCLUSION

It was a refreshing experience to go back to my roots and do something that was raw and organic. Knowing that this project was for an important cause motivated me to exceed expectations. You can learn how to help spread the word and save these marvelous big cats from extinction by visiting the Cheetah Conservation Fund site. Long live the cheetah!

Online and Mobile Sales Shine on Thanksgiving Weekend

$
0
0

Every year on the Tuesday after Thanksgiving I like to look through the news articles, analyst reports, YouTube clips, and social snippets that document the madness during and the results following Thanksgiving weekend shopping. It’s like watching an intense TV show -- there’s comedy, adventure, drama, and sometimes (unfortunately), tragedy. But, the thing I like best about post-Black Friday and Cyber Monday reading is the online and mobile sales data that pours in from various sources and retailers. The trends we see with online sales numbers, mobile browsing, in-store device usage, and even social media engagement have historically proven to be good predictors of what to expect for the remainder of the holiday shopping season. If retailers aren’t keeping a close watch on the outcomes of Thanksgiving weekend shopping, they’re missing out.

This year, we saw more early sales than ever before, with physical stores opening as early as 6pm on Thanksgiving day. (Some, like myself, might balk at those who chose to forego a day of family and friends, football, and grand feasts -- but now we’re secretly envying that colleague who snagged the 16GB iPad Air for a low low price of $360.) Even earlier than that, online Thanksgiving “pre-sales” surfaced on many retailer sites. It’s no wonder that online and mobile shopping over the weekend was at an all time high.

Here are some online and mobile highlights from IBM’s Digital Analytics Benchmark Report for Black Friday and Cyber Monday ...

Online Shopping
Online sales on Thanksgiving Day and Black Friday grew by 19.7% and 19.0%, respectively, from last year, and Cyber Monday online sales grew by 20.6%.

Mobile Shopping
Mobile traffic grew to 39.7% of all online traffic, increasing by 34% over Black Friday 2012. Mobile sales were also strong, reaching 21.8% of total online sales, an increase of nearly 43% from 2012. Cyber Monday showed solid mobile sales as well, exceeding 17.0% of total online sales, an increase of 55.4% year-over-year.

Tablets Rule
Smartphones served as the browsing device of choice on both Black Friday and Cyber Monday with 24.9% and 19.7%, respectively, of all online traffic coming from a smartphone. But, when it came to making purchases, tablets drove double in online sales over smartphones, with 14.4% of online sales coming from a tablet on Black Friday, and 11.7% on Cyber Monday. Tablet shoppers also spent $17-$20 more per order compared to smartphone users on both days. On average, tablet shoppers spent $132.75 versus $115.63 among smartphone users on Black Friday and $126.30 versus $106.49 on Cyber Monday.

iOS vs. Android
iOS users shopped more and spent more than Android users. On Black Friday, iOS users spent $127.92 per order compared to $105.20 per order for Android users. Overall, iOS sales reached 18.1% of all online sales compared to 3.5% for Android. The same went for Cyber Monday -- the average order was about $15 higher for iOS users vs. Android users, and the percent of online sales hit 14.5% for iOS vs. 2.6% for Android.

“Push” Promotions
Push notifications were huge between Thanksgiving Day and Black friday this year. Retailers sent 37.0% more push notifications when compared to the daily averages over the past two months.

Social Influence
Facebook and Pinterest both served as key referral sources for shopping this Thanksgiving weekend. Holiday shoppers referred from Pinterest on Black Friday spent 77.0% more per order than shoppers referred from Facebook. Cyber Monday showed the reverse, with holiday shoppers referred from Facebook spending 6 percent more per order than shoppers referred from Pinterest. However, on both Black Friday and Cyber Monday, Facebook referrals converted at a much higher rate than Pinterest referrals, possibly indicating stronger confidence in personal network recommendations.

Much of IBM’s data falls in line with the results from a survey conducted by the National Retail Federation (NRF):

  • 42.1% of shoppers indicated that they shopped online over the holiday weekend. Of those, the average person spent $177.67 online, which equated to 43.7% of their total weekend spending, up from 40.7% in 2012.
  • Top products purchased online included clothes, DVDs and video games, and books.
  • Shoppers made a dedicated effort to find deals online, with 1/3 of shoppers conducting online searches to find the best deals. Additionally, 36.8% made sure to keep track for emails from retailers.
  • Facebook surfaced as a significant source of holiday shopping deals, with 16.4% of shoppers reviewing retailers; Facebook accounts for information.

Mobile Optimized Sites Take a Bigger Piece of the Online Sales Pie

How do IBM’s mobile numbers stack up against data from retailers who have mobile-optimized sites? Branding Brand, an e-commerce platform which designs mobile experiences for top retailers worldwide, has their own Mobile Commerce Index which samples trends from across the company's client base. In looking at Thanksgiving weekend shopping data from the sample of 152 smartphone-optimized sites, Branding Brand saw smartphone traffic account for 34.4% of its clients’ total e-commerce traffic on Black Friday. This number is nearly 10% higher than what IBM reported, which makes sense since Branding Brand's data comes from clients who have made a dedicated effort to design for mobile. 

All in all, although total sales were down (by almost 3% according to the NRF), online sales soared. Also worth noting is that social is playing a bigger role in influencing purchases, online browsing and shopping is quickly becoming the norm, and passive and aggressive online and mobile promotions are having an increased effect. Most compelling, however, is the year-over-year jump in mobile sales, which are expected to continue. Such numbers reinforce the importance of having a site optimized for a growing mobile audience. Just a few more reasons why retailers should keep pushing the online and mobile e-commerce needle!

Dependency Sorting in Ruby with TSort

$
0
0

If you write Ruby with any regularity, you've probably experienced the dependency-managing wonders of Bundler. What you didn't know, however, was that you can use the same dependency-sorting goodness within your own application in other contexts.

Say Hello to TSort

TSort is a module included in the Ruby standard library for executing topological sorts. Under the hood, Bundler uses TSort to detangle your gems' web of dependencies. Managing gem dependencies, however, is just the tip of the iceberg when it comes to processes that can benefit from topological sorting. With just a trivial amount of work, you can put its awesome power to work in your own projects.

Use Case: Adding Sample Data to a Database

Imagine we have a single task that must populate a database with several records. But life isn't easy; our records have associations with each other as demonstrated in the pseudocode below.

user_1 = User.create address: address_1

school_1 = School.create address: address_2, faculty: [user_1]
school_2 = School.create address: address_3

address_1 = Address.create zip_code: zip_code_1
address_2 = Address.create zip_code: zip_code_2
address_3 = Address.create zip_code: zip_code_2

zip_code_1 = ZipCode.create
zip_code_2 = ZipCode.create

The Problem

If we ran the pseudocode above, it would obviously blow up with NameErrors because multiple records include associational references to records that are yet to be created.

In this simple, contrived example, it would be straightforward to manually sort the statements to ensure that we insert the records that others depend on first. But when our dependency relationships are more complex, or when we simply have a much larger number of records, manual sorting is out of the question. (Who ever liked doing anything manually anyway?)

The Solution

Enter TSort. We can use TSort to programmatically determine an order that these records can be inserted successfully.

The most straightforward fashion of using TSort is through the creation and subsequent sorting of a dependency hash where keys represent an object and values are arrays of references to the objects on which the key object depends.

So if skiing depends on snow, and snow depends on clouds and cold, our dependency hash might look like this:

{
  'clouds' => [],
  'cold'   => [],
  'skiing' => ['snow'],
  'snow'   => ['clouds', 'cold']
}

We only concern ourselves with first-level dependencies; we'll leave TSort to worry about the dependencies of our objects' dependencies.

In order to topologically sort our dependency hash, we need to mix in some TSort functionality. The easiest way to do this is simply to create a subclass of Hash like so:

require 'tsort'
class TsortableHash < Hash
  include TSort

  alias tsort_each_node each_key
  def tsort_each_child(node, &block)
    fetch(node).each(&block)
  end
end

Next we can use our new class to build a dependency hash. The dependency hash for our sample data insert task might look like the psuedocode below.

dependency_hash = \
  TsortableHash[
    user_1     => [address_1],
    school_1   => [address_2, user_1],
    school_2   => [address_3],
    address_1  => [zip_code_1],
    address_2  => [zip_code_2],
    address_3  => [zip_code_2],
    zip_code_1 => [],
    zip_code_2 => []
  ]

Once we've created our tsortable dependency hash, the hard work is over. TSort the hash for great justice and we're left with an array of insert processes that can be executed in order without catastrophe.

dependency_hash.tsort
#=> [zip_code_1, address_1, user_1, zip_code_2, address_2, school_1, address_3, school_2]

# If you have circular dependencies, #tsort will raise a TSort::Cyclic exception.

TSort is an incredibly powerful and easy-to-use tool for organizing dependency relationships. So next time you find yourself struggling with dependency ordering in Ruby, rest assured. TSort is only a click away.

Creating a Film Grain Effect with CSS3

$
0
0

We were thrilled to work with the Wildlife Conservation Society on 96elephants.org. The site tells the story of ivory poaching through maps, infographics, and photos, urging users to take action on the behalf of elephants.

The site turned out beautifully, partly thanks to the stunning high-res images that Viget and WCS were able to assemble. Even though the timeline was short, I wanted to do a little something extra to bring the photos to life, so I added a minor touch you might not even notice - some animated film grain. This effect is done quite simply, with some CSS and a single image. Here's how:

Codepen example »

Create the image

Let’s start by generating some grayscale noise in Photoshop.

  • Create a white canvas. For this example, I'm using a 500x500 canvas, but you can actually go much smaller without a noticable difference.
  • Add noise by selecting Filter > Noise > Add Noise (make sure you check 'monochrome')
  • Your noise will look a little sharp, since it's still individual pixels. To make it 'clumpier', you can increase the image size by about 15%


Next, create a selection area from the noise:

  • Invert the noise with CMD-i (all shortcuts listed are for Mac). This will turn the dark spots light, which will allow you to select them.
  • Go to Channels and select an individual color (it doesn’t matter which one)
  • Click the ‘Load channel as selection’ button at the bottom of the panel

Now that you have a selection, you need to make two layers: a light and a dark one. Having both will keep your image from being too dim or washed out, and gives you more control over the effect.

  • Create a new layer (make sure you still have your selection) and fill it with black (hit d, then OPT-delete)
  • Create another new layer and fill it with white (hit d, then x, then OPT-delete
  • Rotate the white layer 90 degrees, to randomize the noise

Now, you have two noisy layers - one light, one dark. Place a photograph beneath them to test them - you’ll need to adjust the opacity of both layers to find the effect that works for you. Remember to use the 'Normal' blending mode for both.

Once you’re happy with the opacity, delete all layers except the light and dark noise. Now you’re ready to...

Save and optimize

Go to File > Save For Web, and save the image as a PNG-24 with transparency.

You’ll notice that the resulting file is huge, but that’s because it’s using 24-bit to only show a handful of colors. Let’s optimize it:

  • Open ImageAlpha, and open your noise image in it.
  • You should be able turn the colors way down, even to 16. Test the results over the built-in photographs to make sure that too much detail isn’t being lost.
  • File > Save As — your image should be considerably smaller.

Mixins

Before you jump into CSS, you’ll probably want to make sure you have some mixins that cut the tedious repetition of vendor-specific keyframes and animations. In the example, I just made some quick ones, but it’s easier to just grab a gem like the Compass Animation one. Since I'm already using Sass in these examples, I'm going to make the final effect a mixin as well. 

The keyframes

Because your noise looks so random, and because it’s going to be moving so quickly, you don’t need anything too sophisticated here. You can get away with just taking the noise and translating it from place to place.

+keyframes('grain')
  0%, 100%
    +transform(translate(0, 0))
  10%
    +transform(translate(-5%, -10%))
  20%
    +transform(translate(-15%, 5%))
  30%
    +transform(translate(7%, -25%))
  40%
    +transform(translate(21%, 25%))
  50%
    +transform(translate(-25%, 10%))
  60%
    +transform(translate(15%, 0%))
  70%
    +transform(translate(0%, 15%))
  80%
    +transform(translate(25%, 35%))
  90%
    +transform(translate(-10%, 10%))

It’s important to use translate, as opposed to position or background-position, because translate doesn’t cause repaints. Doing the same effect with background-position actually made my fans spin when I tried it - it’s significantly slower than translate.

The final mixin

The last piece of the puzzle is a mixin that you can include on any element that wraps an image or has an image background (why a @mixin and not an @extend? Mixins tend to create smaller code, once gzipped, than extends do, and they’re more flexible than @extends).

=grain
  // all elements with noise need overflow hidden, or else the noise
  // bleeds out of the element and totally messes stuff up 
  overflow: hidden

  // if you're using this a lot, here's where you would add 
  // some extra logic regarding z-index. For example, adding... 
  //
  //   > *
  //     z-index: 2
  //
  // ...will ensure that your :after elem slips *under* other elements
  // however, on a larger site, you'll want even tighter control over how
  // :after and your other contained elements behave

  &:after
    // using steps() prevents the animation from transitioning
    // from position to position - this is good, you want the
    // animation to be jerky
    // 
    // you can speed up and slow down the animation 
    // by adjusting the duration
    +animation(grain 5s steps(10) infinite)

    background: url(http://cl.ly/image/2m2R0A3m1b3x/noise.png)
    content: ''
    display: block

    // we make the element extra-large so we can shuffle 
    // it around without exposing the edges
    height: 300%
    left: -100%
    position: absolute
    top: -100%
    width: 300%

And that’s it! Here’s that example again. It’s a pretty gimmicky effect, but it shows off how much you can accomplish with keyframes and pseudo-elements. If you’ve done anything similar, or have your own ideas, let me know in the comments.


How I Plan Trips and Travel Like a Pro

$
0
0

I love to travel and I’ve always been fascinated by other countries and cultures.  We moved every year when I was growing up -- and I was always the one lobbying my father to request overseas tours.  Therefore, selecting a college with a strong International Business program (and required foreign language fluency) was a no-brainer for me.  I had dreams of spending my life living and working in countries around the world.

Well, sometimes life doesn’t always unfold the way you envision.  I haven’t (yet) worked outside the U.S.; but, I have managed to visit quite a number of countries.  People who know I travel extensively always ask for tips and recommendations.  I’ve found that the research, communications, budget-tracking, and organizational skills I’ve mastered after decades of project management lend themselves quite nicely to effective trip planning.  In no particular order, here are some of the practices I follow and skills I leverage when planning a trip:

  • Build a cost spreadsheet.  I project all trip costs and identify whether they occur pre-trip, during-trip, or post-trip.  I identify whether they will be paid via credit card or cash -- and, I identify whether those cash requirements are in USD or a foreign currency.  I also go so far as to identify the denominations of the currencies I need (e.g., singles for tips, a $20 bill for a visa at the airport).  I include costs for everything from taxis to/from the airport to daily tips for the chambermaid to my evening bar tab.  I typically use Excel vs. Google spreadsheets simply because some of my friends have not embraced Google to the extent that we have here at Viget.
  • Generate a “cheat sheet” reference card to easily convert currencies back and forth.  I use a large index card to plot out $1, $10, $50, and $100 conversions in both directions, which will fit in my wallet or coat pocket.  I reference xe.com for the latest currency exchange rates.  This ensures that I don’t get confused when shopping or exchanging money due to jet lag and either pay some crazy amount for some tchotchke -- or pass up a real deal because I’m not thinking clearly.
  • Head to the bank for “clean money.”  Many of the places I travel have strict foreign exchange rules:  money must be new (with the larger Presidential pictures on them); crisp and clean (no dye marks, handwriting, or torn edges); and generally not larger than a $50 bill.  Hundred-dollar bills are commonly counterfeited in certain regions of the world and money-changers just won’t take them.  I go to the bank at an “off” time in the late afternoon when tellers have more patience to search their tills and their cash supplies for just the types of bills I’m looking for.  Depending on how much cash you’d like to take, this exercise may take a couple trips to the bank, so this is one task I do not leave until the last minute.
  • Call my bank(s) to avoid account freezes.  I appreciate the fraud prevention controls my banks put on ATM and credit cards; but, nothing spoils a vacation like trying to use your card somewhere to discover that the bank has flagged and frozen the account for suspicious charges.  Ever since this happened to me a few years ago, I’ve called my banks ahead of time to let them know when/where I’ll be so they’re less inclined to trigger the “freeze account” feature.
  • Double-check immunization and travel warning status of destination(s). I check the CDC web site and the US State Department web site in the early stages of booking a trip; however, I revisit both sites before departure to verify that there hasn’t been an outbreak or new travel advisory issued for either my destination or any transit point on my itinerary.  Your family doctor doesn’t keep all immunizations on hand -- you will need to visit a travel clinic for protection from things like yellow fever or typhoid.  If you are local to the Northern Virginia area, I recommend Capitol Travel Medicine for your immunization/malaria prevention needs.
  • Always have a Plan B.  Think through options for dealing with any problem that may arise with your itinerary.  How will you deal with a missed connection?  What will you do if your arranged airport pick-up is a no-show?  What happens if you get hurt and need medical attention?  What happens if your wallet or passport is lost or stolen?  What if someone doesn’t take credit cards?  What if there aren’t ATMs available?  How will you communicate if someone doesn’t speak English?  How will not having Internet access affect any of the above plans?
  • Take print-outs with you. Yes, here in the US, we can handle quite a few situations via our mobile phones.  But, you may not want to pay for mobile Internet access overseas.  And, places like airports often require registration and fees for WiFi access.  Don’t rely on having access even if you think you’ve planned ahead by getting the appropriate SIM chip for your phone.  Have something with you that has your hotel information printed on it, as well as your flight information and anything else important.  Ditto any research you’ve done in advance about a cool restaurant to try or the phone number and address of that Segway tour operator you want to contact for reservations.  You can simply pitch the paper as your trip goes along and the information becomes unnecessary.
  • Buy trip insurance for peace of mind.  If you book group tours, they often try to sell you their trip insurance.  Sometimes it’s a good deal and sometimes it’s a rip-off.  I don’t believe in any pricing model where the insurance is a straight percentage of the price of the trip (just like I hate buying anything online that uses a similar shipping model where shipping is priced as a percentage of the cost of the item vs. its weight).  Therefore, I typically use Squaremouth to buy trip insurance.  They’re a trip insurance aggregator that allows you to tweak every element of coverage to obtain competitive quotes for exactly the kind of policy you are comfortable with.  I don’t buy insurance for every trip -- but, I do if the trip is expensive and if something like medical evacuation would empty my savings.  I recently just bought a policy for an upcoming trip for $38.  Knowing I’m covered for worst-case scenarios is worth that amount to me.
  • Line up local tours/guides to get a lay of the land.  You may pride yourself on being an independent traveler.  But, it’s often well worth the investment to join a half-day or whole-day group tour to get a feel for how a city is laid out or what attractions will be worth your time.  I love the hop-on/hop-off double-decker buses in various cities for this reason (plus, they typically narrate in English).  I also love the aforementioned Segway tours.  And, I’ve done advance research and called local tour companies upon arrival to arrange things like winery tours, city tours, and township tours.  I’ve also spontaneously hired friendly and honest cab drivers to be my private driver/guide for the day.  I’ve been wanting to try this organization for awhile, but just haven’t had the chance.  If you’ve used them, I’d love some feedback.
  • Make lists!  I love lists.  And, I love crossing items off lists.  I think fellow PMs would agree that hardly anything is more satisfying.  When planning a trip, I make many lists:  a packing list, a workload-coverage list for the office, a prepare-the-house list, etc.  These usually devolve into multiple sub-lists.

As you can see, research, planning, attention to detail, contingency planning, and budget monitoring are all valuable PM traits that I leverage outside of work to plan vacations for me and my friends.  How do you use your PM skills outside of the office?

Reroute Plugin for Craft

$
0
0

You know what's really annoying? Having a million redirects in your .htaccess file. When we build EE sites, Detour Pro has become a part of our builds so that other team members and clients can manage redirects. But, that solution won't really work when you launch your first Craft site for a client!

Introducing Reroute for Craft

I had previously built a couple of small Craft plugins, but none with control panel sections and database tables. So I decided to dig in and give it a shot.

What came out was a lovely simple interface for adding redirects. Here is the page that lists your redirects:

Reroute List

And here is the simple form to add a new Reroute:

Reroute New

Tom Haverford

I've gotta say the Craft Documentation and Cocktail Recipes sample plugin were extremely helpful in building it. There were still times where I couldn't find what I needed, but luckily Pixel & Tonic was always there to help!

You can download the plugin on GitHub. Enjoy!

Boulder Project Manager Meetup Wrap-Up: Project Manager Training Discussion

$
0
0

A few weeks ago Boulder area Web Project Managers (PMs) once again came together for a Boulder Web Project Manager Happy Hour. This gathering focused on PM Training. A few questions we asked were: 1) What have we done to train as PMs?; 2) How do we train new PMs at our companies?; and 3) What training is  working and what isn’t? This topic proved to be interesting and generated plenty of conversation.

Based on the conversation, it’s clear most web PMs are encountering similar struggles with training. There are a few specific types of training PMs have received or found useful, but short of those structured programs, there’s generally a void. (Much of our conversations focused on what training might fill that void.) Below are the main topics we discussed, and the conclusion I left with.

To be fair, there is an Internationally recognized certification option for PMs

The most commonly recognized credential for a PM is Project Manager Professional (PMP) certification offered through the Project Management Institute. PMP certification is given to PMs in many different fields, and is a rigorous (and expensive) process. A PM must have a certain level of education, a minimum number of years as a Project Manager, a minimum number of Project Management hours under her belt, and must pass a test in order to get certified. To keep a PMP certification a PM must also achieve a specific number of Professional Development Units (PDUs), or points, every 3 years. Points are earned by attending—and paying for—community events and trainings.

If you aren’t familiar with PMP certification, you may be wondering why there are any questions about Web PM training when there’s a clear option in front of us. In addition to the cost of events and training associated with PMP Certification, there is another issue specific to Web PMs: the roots of PMP focus on waterfall type project management. Although there are agile focused professional development opportunities offered through PMI, there is more focus and understanding of a waterfall style of project management which can feel less valuable to a Web PM.

In short, PMP certification feels pretty old-school to many younger, web-focused PMs. The industry appears to feel the same, as many PMs at the meetup had never known a small or even mid-sized Digital Agency to seek PMP certification in its Project Managers. Of course PMP certification has its place (and importance) in many industries, but it seems like it misses the mark for training a Web PM.

If PMP certification feels outdated, then surely the answer lies with Agile and Lean training, right?

The latest structured training programs are focused on the Agile Software Development methodology. You can get ScrumMaster Certification, Scrum Professional Certification, and even become Scrum Coach or Scrum Trainer certified. You can also receive training and certification in all sorts of Lean principles, including Six Sigma certification.

I’ve heard debate on the merits of this type of certification—it can be expensive, but I think the bigger problem is that in order for it to be valuable, your organization must (pretty strictly) employ the philosophies and principles of Agile and/or Lean software development. I’ve been through Lean training and I’ve been certified as a ScrumMaster. Both of those training resources work well in terms of understanding Agile and Lean philosophies, but the certification can be overkill when I’m not living and breathing Scrum or Lean principles.

Still, Lean Training and ScrumMaster certification only requires a day or two of training for each. It’s much less rigorous than a PMP certification, and the lessons learned can be valuable—although, I’d recommend reading a book that covers those topics over paying the sometimes high cost of training.

So then what? What else is out there?

That’s exactly the question we asked at the meetup, and the answer isn’t clear. We all agreed that we want to improve as PMs. We also tended to agree that there isn’t a great distinction between senior PMs, PMs, or junior PMs at agencies. Usually it’s a matter of simply accumulating more experience that allows for growth, rather than demonstrating an improvement in skills. This would suggest that we are learning (and theoretically improving) with every project we run. That is definitely true, but if there’s a skill I’m weak in, simply running more projects isn’t necessarily going to improve that skill.

I know I’ve personally found being involved in a larger PM community helps provide education opportunities. Simply talking to other PMs about what they do, what challenges they’ve faced, and how they’ve handled those challenges has given me plenty of new ideas on how to approach the work I do. In addition, the presentations at the 2013 Digital PM Summit were a great opportunity to learn, and led me to believe that attending similar conferences could be a great way to continue growing as a PM. But unfortunately, in terms of concrete training, the opportunities do seem to be lacking.

My takeaway from this Meetup, and from follow-up discussions here at Viget, is this: access to relevant training is a problem many PMs are experiencing, and it’s something we should address. I intend to start putting together a roadmap for training as a PM. There are great books, individual classes, and conferences that can be extremely valuable. A great start will simply be to pull these resources together in one place.

I’d love to hear what you think should be in that roadmap? Even better, does your company already have a training plan you’d like to share?

Also, If you are a Digital Project Manager in the Boulder Area, we’d love for you to join us for our next event!

Attending the Ivory Crush

$
0
0

On November 14th of this year, the U.S. Fish and Wildlife Service crushed six tons of seized elephant ivory at the Rocky Mountain National Wildlife Range outside of Denver. It was a very public move by various government agencies (e.g., the Department of Justice and the Department of State) and many non-government organizations. The goal was to highlight the increasing threat of the ivory trade around the world to communities and, most importantly, to the elephant species. Witnessing the event in person was particularly meaningful to me, given Viget’s work with the International Fund for Animal Welfare (IFAW) and WWF—both of which were among the event’s organizers— and given our launch last September of 96Elephants.org, an award-winning site we created in collaboration with the Wildlife Conservation Society (WCS) to highlight this exact issue.

Working on the web, we can sometimes become divorced from what’s happening in the physical world, on the ground, beyond our computer screens. When we began creating 96Elephants.org, for instance, the team certainly appreciated the severity of the problem. But things snap into focus just a little bit more when your site launch is timed with an announcement by Hillary and Chelsea Clinton (specifically, the Clinton Global Initiative) at the United Nations, or you see, in-person, what six tons of ivory actually look like and realize the number of elephants slaughtered to amass such a collection.

At Viget, we’re adamant about looking for projects and clients that we find meaningful, and about which we’re passionate. It was a privilege to attend the ivory crush and see how our work can connect to a pressing, real-world issue. It was humbling to be a part of it and to feel that, in whatever small way, the digital work we create is contributing to a global movement to protect elephants from extinction.

Happy Holidays. Let’s Make Something.

$
0
0

Viget is a digital agency and for a long time that meant we only made digital stuff.  Software, apps, sites, and the like. Recently, a new trend has emerged: software is creeping its way into, well, everything. Adventurous companies like Viget are helping it creep by experimenting in various ways beyond the browser. Increasingly, we’re working away from the keyboard, making physical products that people interact with in entirely new ways—which is exciting because we love to make things.

If you follow Viget, you know that for a decade or more we’ve had a holiday tradition that embraces that love of making stuff. Every December we make—with our bare, but carefully washed hands—a simple gift to send to our friends that’s inspired by the circles in our logo. Usually you just eat it, like 2007’s VigetRocks or 2012’s Vigesauce. Sometimes, we ask you to do something like grow it, as in 2008’s Vigeturf, or color it like 2010’s Vigegram

This year, you might be able to eat it (I wouldn’t recommend it); but, we are asking you to do something. To make something actually. With your own hands. While building software-powered, network-connected, possibly-sentient robots is a blast, there’s something very primal and calming about creating something out of the most basic material. We call it...Vige-Doh.

With Vige-Doh, we’re sharing our love of making things (and our love of retro 80’s playthings) by giving you the raw material to make whatever you’d like. It could be a snowman, a puppy, or miniature Washington Monument. If you also love old-school stop-motion claymation (like I do), might we suggest a short-film captured via Vine or Instagram? Be it a photo, video, or just a crusty statue on your desk, don’t forget to tag it #vigedoh.

We had fun making it for you. The Boulder office worked on the packaging design:

Durham made huge vats of Vige-Doh—over 30 pounds!

Our Falls Church office pulled everything together, production line-style.

Tonight, the first batch of Vige-Doh ships out, right on schedule. If you’d like your own batch, send your address and a description of what you plan to make to yo@vigedoh.com, and we’ll hook you up (while supplies last).

Happy Holidays, from all of us at Viget!

Confident Ruby: A Review

$
0
0

Over the past six weeks, the development team here at Viget has been working through Confident Ruby, by Avdi Grimm. Confident Ruby makes the case that writing code is like telling a story, and reading code littered with error handling, edge cases, and nil checks is like listening to a bad story. The book presents techniques and patterns to write more expressive code with less noise—to tell a better story. Here are some of our favorites.

Using Hash#fetch for Flexible Argument Confidence

Lawson: Using option hashes as method arguments is great; it reduces argument order dependencies and increases flexibility. But with extra flexibility comes extra danger if you’re not careful.

def do_a_thing(options)
  @important_thing = options[:important_thing]
end

# Inevitably
do_a_thing(important_thin: ImportantThing.new)

Typo-ing a key in the hash provided to method has started causing errors everywhere @important_thing is used, and it’s not immediately apparent where the bug truly lies. This is most definitely not confident code.

You can increase the confidence of the method like so: @important_thing = options[:important_thing] || raise WheresTheThingError, but this solution falls on its face when you require the ability to use nil or false as values.

Avdi suggests the liberal use of Hash#fetch to increase your code’s confidence without such value inflexibility.

def do_a_thing(options)
  @important_thing = options.fetch(:important_thing)
end

Using #fetch establishes an assertion that the desired key exists. If it doesn’t, it raises a KeyError right at the source of the bug, making your bug scrub painless.

And there’s another benefit too; you can #fetch to set default values, while maintaining the flexibility to explicity use false or nil.

def do_a_thing(options = {})
  @important_thing = options.fetch(:important_thing) { ImportantThing.new }
end

Document Assumptions with Assertions

Chris: It’s happened to every developer: you need to load data from an external system, but the documentation is incomplete, unhelpful, or nonexistent. You have sample data, but does it cover all possible inputs? Can you trust it?

Avdi suggests, “document every assumption about the format of the incoming data with an assertion at the point where the assumed feature is first used.” I like those words. Let’s see how it works in practice.

Suppose we’re writing an app to load sales reports from an external service and save them in your database for later querying. (Perhaps this app will show fancy charts and pizza graphs for sales of sportsball jerseys.) You might start with this code:

def load_sales_reports(date)
  reports = api.read_reports(date)

  reports.each do |report|
    create_sales_report(
      report['sku'],
      report['quantity'],
      report['amount']
    )
  end
end

Simple, clean, readable. And full of assumptions. We assume:

  • #read_reports always returns an array
  • report is a hash and contains values for sku, quantity, and amount
  • the values in report are valid inputs for our application

Let’s make some changes. (Assume we’ve determined that amount is a decimal string in the data and we will store it as an integer in our app.)

def load_sales_reports(date)
  reports = api.read_reports(date)

  unless reports.is_a?(Array)
    raise TypeError, "expected reports to be an array, got #{reports.class}"
  end

  reports.each do |report|
    sku      = report.fetch('sku')
    quantity = report.fetch('quantity')
    amount   = report.fetch('amount')

    cents = (Float(amount) * 100).to_i

    create_sales_report(sku, quantity, cents)
  end
end

Here’s how we’ve documented those assumptions

  • Raise an exception if reports is not an array
  • Retrieve the values using Hash#fetch
  • Convert amount to a float using Kernel#float, which, unlike String#to_f, will raise an exception if the input is not a valid float

Benefits to this approach include:

  • Initial development is easier because each point of failure is explicitly tested
  • Data is validated before it enters our database and app, reducing unexpected bugs down the road
  • No silent failures—if the data format ever changes in the future, we’ll know

High five.

Bonus Tip: Transactions are your friend

All this input validation is great, but if you aren’t careful a validation failure can easily put your database in an inconsistent state. The solution is easy: wrap that thing in a transaction.

SalesReport.transaction do
  sales_importer.load_sales_reports(date)
end

Any exception will rollback the transaction, leaving your data as it was before the import. Sweet.

You shall not pass!

you shall not pass

Ryan S.: I came across a section that talked about a really helpful pattern referred to as bouncer methods. These are methods that serve as a kind of post-processing state-check that either:

  1. Raise errors based on result state; or
  2. Allow the application to continue if the result state is acceptable

If you’re in a situation where you have a method that performs some kind of action regardless of input and then has to make sure that the resulting output is valid or else throw an error, look no further!

def do_a_thing_with(stuff)
  check_for_valid_output do
    process(stuff)
  end
end

def check_for_valid_output
  output = yield
  raise CustomError, 'Bad output!' unless valid_output?(output)
  output
end

def valid_output?(output)
  # do your validations
end

Well-written methods usually have a narrative to them. Bouncer methods are a great way to signal that the result of some nested action is going to be checked before allowing the application to continue on. They can help you maintain a narrative without cluttering up your method with explicit validations and/or error handling.

BRE GTFO LOL

David: Avdi opens his chapter on “Handling Failure” with a topic near to my heart: the awfulness of the begin/rescue/end (“BRE”) block. My favorite quote:

BRE is the pink lawn flamingo of Ruby code: it is a distraction and an eyesore wherever it turns up.

A top-level rescue is always preferable to a BRE block. If you think you need to rescue an exception from a specific part of your method using a BRE, consider instead creating a new method that uses a top-level rescue. Before:

def foo
  do_work

  begin
    do_more_work
  rescue
    handle_error
  end
end

After:

def foo
  do_work
  safe_do_more_work
end

def safe_do_more_work
  do_more_work
rescue
  handle_error
end

Much cleaner (terrible method names aside).

throw/catch for great justice

Ryan: Just the words “throw” and “catch” scare me. They remind me of dark, sad Java programming days. I’ve always been vaguely aware that Ruby, like Java, had throw and catch, but I’ve never used them. In Ruby land, our exception handling is raise and rescue. So what are throw and catch for?

Avdi shows an example in the book where a long-running task has the option to terminate early by raising a custom DoneException. Exceptions used like this can be handy to break out of logical loops. But is the act of “finishing” really exceptional? Not really.

Exceptions should be reserved for truly unusual and unexpected events. The code’s author was only hijacking DoneException because it could punch out of the current stack to finish executing.

Enter throw/catch. They give you the same power of execution flow without raising an exception:

def consume_work
  #do things

  throw :finished if exit_early?
end

#elsewhere

def loopy_work
  while read_line
    consume_work
  end
catch :finished
  #clean up
end

throw/catch allow the code to be intentional. The execution is clearer to the reader and doesn’t raise unnecessary exception-esque attention.

Conclusion

Confident Ruby is an excellent book and we've already applied many of its lessons in our projects. It's packed with useful techniques and patterns—most of them are practical and immediately applicable, and all of them will help you write code that tells a better story.

Check it out and let us know in the comments what your favorite parts were. If you want to join us for the next round of book club, why not apply to work with us?

How to Pull Together a Pancake Breakfast

$
0
0

Hey office managers, administrative assistants, and other people who generally make the office better! It’s the holidays, which most likely means your staff is out of the office and won’t be back until the new year. Why not surprise them with something fun and delicious when they return? I promise they’ll love you for it.

How to Pull Together a Pancake Breakfast

1. Pick a morning - Pancakes will make any morning better, but especially Mondays.

2. Tell people or don’t - You can let people know you’ll be cooking up pancakes to increase anticipation (and so they don’t eat breakfast beforehand), or you can keep it a secret and really surprise them.

3. Purchase the ingredients - Here are the ingredients I use, but you can get creative with it!

  • pancake mix or ingredients for real pancakes (enough for two pancakes per person)
  • syrup
  • butter (for cooking and for spreading on pancakes)
  • powdered sugar
  • whipped cream
  • fresh fruit (blueberries, strawberries, bananas)
  • mini chocolate chips

4. Gather cooking supplies - Most of this stuff I bring from home or have at the office. The electric griddle was an investment, but one that was well worth it.

  • large mixing bowl
  • measuring cups
  • ladle
  • spatula
  • electric griddle
  • plates
  • forks
  • knives
  • napkins
  • serving spoons

5. Prep the ingredients - Clean and cut the fruit and store it in separate bowls in the refrigerator. Put the powdered sugar in a shaker and the chocolate chips in a covered bowl. Doing these things the night before will leave a lot less to do in the morning.

6. Make the pancakes - Set the griddle to 375 degrees. Mix the batter. Set out the fruit, chocolate chips, whipped cream, powdered sugar, and syrup. Start taking orders as people come into the office.

And finally, take pleasure in making your coworker’s mornings a little better and a little fuller.


Competence and Likability as Keys to Success

$
0
0

I’m glad I caught the podcast of Karen McGrane’s Closing Plenary from the 2013 IA Summit (transcript and audio available here)—I only wish I could have been there to hear it live. While full of wisdom, there was one piece of her talk that kept replaying in my head. In it, she describes a graph with two axes:

“Another way to put this is, all of the people that you work with, you could rank them on two axes, how good they are at their job, how competent they are, and how likable they are. So if you are both competent and likable, you are a dreamy rock star and everybody will want to work with you.

She goes on to describe how the two axes form four quadrants. The quadrants represent four personas: incompetent jerks, competent jerks, lovable fools, and rock stars.

She explains how the competent jerks and lovable fools add complexity to a working environment.

“Do you know who the most damaging people are in an organization? It’s the competent jerks. It is the people who, by the fact that they are good at their job, stick around in the organization but they limit the organization’s ability to evolve, to change, to grow, because they are not a good cultural fit, because they have a bad attitude, because they don’t collaborate well, because they’re jerks to be around.”

“Do you know who the most valuable people in the organization are, especially in terms of effecting change? It is the lovable fools. They are the social glue that keeps the organization together. They are the people who can socialize ideas, can bring information from one group to another. They provide the lubrication that keeps that organization running smoothly.”

Karen presents an interesting concept here, but seems to omit an equally important issue: the fact that I don’t want to work with competent jerks OR lovable fools. I only want to work with the rock stars—people who are both extremely competent and wonderfully likable. Is that really too much to ask? And is that even possible?

Well let’s think about it. What if your hiring standards were so high that you never hired the jerks and fools in the first place? What if you only hired rock stars? And how would you go about doing that?

Competence gets a foot in the door.

I believe competence and likability are fairly simple to evaluate—at least sufficiently to know whether or not to proceed with an interview. You can evaluate competence by looking at a resume or reviewing a portfolio. Sometimes a simple quiz or homework assignment is needed for further assessment. Someone who exhibits reasonable competence and likability can easily earn an interview.

Likability gets the job.

But likability, that’s tougher. Or is it? You wouldn’t hire someone based on his or her likability alone. I have lots of friends who are likable but I wouldn’t necessarily hire them to work with me. So likability is somewhat secondary to competence—although someone who is highly likable and a quick study could be a person with immense potential. Someone who exhibits both high competence and likability surely has a great chance of landing the job.

Striving for both is the key to success.

But what happens next? How does a candidate—now employee—live up to the expectations he set when he was trying to be at his best, and how does he exceed expectations once he’s landed the job? It’s easy to get comfortable in a job once you’re in. Comfortable is...well, it’s comfortable! But it may not get you very far.

I believe achieving success is simple if you keep to the path we’ve illustrated so far. Work hard to improve your competency—this means making time for professional development to improve your knowledge and skills. Then learn what people like—and don’t like—about working with you. Amplify the good, and work hard to improve the bad. If your workplace doesn’t provide peer reviews, create your own and solicit your co-workers’ feedback, even if it’s anonymous.

Competence gets a foot in the door. Likability gets the job. Striving for both is the key to success.

You can become the rock star you were born to be, but no one just sits back and “becomes” a rock star. Strive to improve your work and your ability to work with others, and before you know it, you’re signing autographs and noshing on bowls of hand-selected green M&Ms.

Or maybe just succeeding wildly at a job you love.

Thank you, Karen for planting a seed.

Announcing the New WRAL.com: A Responsive News Experience

$
0
0

As a long-time North Carolina resident, I know there is no news source that is trusted more in the Raleigh-Durham area than WRAL-TV and WRAL.com. It is the primary local news outlet for a large and diverse demographic, including the majority of our Durham office. When WRAL approached us with the opportunity to redesign WRAL.com, we saw a chance to help improve a site experience that many of us use daily for our local news and weather updates.

A Trusted Source for High Quality Content

For decades, most local news organizations have failed to make good on the web’s promise for expanding the reach of local news coverage, frequently just recycling television content on outdated web pages. Not so with WRAL. We knew that WRAL.com was already providing the most trusted and current local news content, including weather, politics, and sports––the site gets over 175 million visits per year. As far as media markets go, very few local media outlets can boast such wide adoption and demand. 

Today's news - redesigned

New Challenges in Responsive Design

While Senior User Experience Designers Jason Toth and Todd Moy had worked to address and solve many complex challenges for a variety of clients, they had never worked with a client to create a site experience that so heavily relied on advertising to generate revenue. In this case there were new and specific design considerations to address, and a need to meet both advertisers’ interests as well as the users’.

WRAL had a specific goal of creating a responsive news site, but there were clear challenges in migrating its varied content into a design that would realize that goal. Senior Designer Mark Steinruck worked closely with Jason and Todd to begin the design for the site in a modular, flexible, dynamic, and systematic fashion––providing WRAL.com with the necessary foundational system design to last well into the future.

Whiteboard sketching of story modules

True Team Collaboration

With legacy content and advertising placement considerations, the challenges on this project were not solely those of the UX and Design Team, but shared with our Front-End Development team. Front-End Developers Nate Hunzaker and Chris Manning worked closely with the team as a whole to provide technical solutions for complicated problems. They took design theory and made it a reality by building a responsive framework for displaying ads, promotions, and news stories. 

Prototyping review with the team

This is just a glimpse into what was one of the proudest projects of my career. Working with both a driven and discerning client, and a dedicated and innovative Viget team, I felt fortunate to play a small part in the development of the next iteration of a site I use every day. 

For more insight into our process, check out the full story here. Today, we’re thrilled to celebrate our collaboration with WRAL and present the new WRAL.com.

Power Tools for Content Inventories

$
0
0

Spreadsheets, strong coffee, and good ol’ fashioned clicking, cutting, and pasting are tried-and-true tools for conducting content inventories. And despite how pedestrian they are, they do the trick for most sites. Sometimes, however, I need tools that are more efficient, present information differently, or allow more interactive exploration.

To fill these gaps, I've added a few other tools to my repertoire. Because they serve niche purposes, I don't employ them on every project. But having them around helps me stay efficient; hopefully they'll help you too.

Here are four (free!) tools I've been loving recently.

Scraper

The other day, I wanted to pull titles and URLs for hundreds of fellowships, internships, and residencies into a spreadsheet for categorization and annotation. Getting a database dump from the developer was taking too long and I’m too lazy to copy and paste all of that. Plus they were in an orderly format on the site. Gotta be an easier way, right?

Scraper

Scraper is a Chrome Extension lets you intelligently extract content from a page. Though it will work on nearly any textual content, it’s particularly well suited for scraping structured lists – say, an index of articles or a collection of products. If the content is marked up predictably, you can probably pull it out with Scraper.

To use it, you right-click an example item on the page and choose "Scrape Similar". It then tries to find that example's siblings on the page. For simple pages this works pretty well out-of-the-box. For more complex content, I use the Jquery-style selector syntax to target exactly the items I want.

Once you’re done, you can export your results directly to Google Sheets. 

Grab Them All

A recent project involved site whose content is organized into 70 independent business units. Most units used similar layouts but their content and IA varied widely. There was no good representative sample, so I needed a way to view all the home pages for the business units at once. Viewing them as small mutiples, I surmised, would give me a visceral sense of commonalities and differences.

But screenshot all of them? Ain’t nobody got time for that.

Grab Them All is a Firefox extension that automates the screenshot process. You provide it with a text file of URLs and a destination directory. Once you click “Let’s Go!”, the app sets off and takes screenshots of the entire content of each page. Neat.

I fired up Scraper, grabbed a list of URLs from the business unit listing page, and set Grab Them All loose. A few minutes – and one Sweet ’n’ Salty later, natch – I had a directory full of images. 

Google Refine

One big site I worked on totaled over 100k unique pages, many of which were based on unstructured content. Content had been developed over time by a set of authors with little governance. As a result, old content and differences in organization were rampant.

To decompose the problem, I got a .csv dump of every page URL on the site, along with metadata like date edited, last author, and template used. Awesome. When I threw the data at Google Sheets and Numbers, both balked and whined once I started cleaning up and filtering the data. Not Awesome.

Enter Google Refine (aka Open Refine). Originally developed for people who need to make sense of messy data, OpenRefine is like a spreadsheet on steroids. It really shines when you need to clean up and explore large datasets. While it offers many compelling features, to me, a few things really distinguish this from other tools: 

  • GREL - an expression language that allows you to slice, dice, and transform content
  • Faceting - if you like Pivot Tables (and even if you don’t), you’ll love the iterative faceting  that Refine provides.
  • Typed Data - the faceting UI chooses an appropriate control based on the column's data type
  • Large Datasets - hundreds of thousands of rows aren't really a problem

Using GREL, I was able to extract meaningful information from the URLs like content type and site section. With this and other data, I could use the faceting interface to quickly perform ad hoc queries like: “What pages were last edited between 3 and 10 years ago – and who is responsible?” From there it was easy to produce punch lists of pages for authors to review and cull.

Integrity

On old, unstructured sites, there is often no discernible logic to where pages are placed. Routinely I'm surprised to discover whole sections of content that don’t show up anywhere in the the navigation, the sitemap, or possibly the database export. This poses a problem — how do you know when you’re done? There are unknown unknowns.

Integrity is a site spider that rips through a site, logging as many pages as it can find within the parameters you set. Originally developed as a QA tool to check links, it complements a manual inventory and clever google searching to reveal as many hidden pages as possible. 

Every time I run it – without fail – the results are surprising. I’ve found old campaign sites referenced through press releases, links to undocumented portals, decommissioned products, old versions of the site, and more. Having this data provides a satisfying check against a manual inventory.

What do you use? 

These are just a few of the tools I like to employ and I know there are tons more I haven't discovered. If you have any you're particularly fond of, share them in the comments below. And if you're interested in diving deeper, check out related posts posts on visualizing your site as a treemapcreating traffic heatmaps with R, and crafty ways to use Google for content audits.

Words Matter

$
0
0

Words matter. They are abstractions, too—an interface to thought and understanding by communication. The words we use mold our perception of our work and the world around us. They become a frame, just like the interfaces we design.

The preceding is pulled from Frank Chimero's What Screens Want, a wonderfully crafted essay about design on the web. For designers and, more broadly, visual thinkers, words and language can often feel redundant. After all, we work on canvases, crafting wireframes and compositions for people to see. In a different universe, our work could stand by itself without added explanation.

This of course is not reality. Words matter and they impact our work. They matter the moment a problem is introduced. They are absolutely critical when we present our designs, both internally and externally. And, they matter when we try to shape someone else's work through feedback. While we may prefer to deliver static images or functioning prototypes—to show versus tell—words cannot be avoided. As the foundation of all communication, words by default are most accessible for they effortlessly travel across all channels from formal presentations to impromptu conversations.

Words are also messy. What is true, what is said, and what is heard are often very different things. This reality deserves consideration when we communicate design. For example, when a project begins, is the problem defined using a shared vocabulary and with enough clarity and specificity? When we present our designs, are we summarizing our many decisions accurately, honestly, and consistently? In the absence of visual support, what words would best convey our design? Is it a dropdown or, more accurately, a mega-menu? Will the element slide into view or grow into view? When we offer critique, is there more to be said than a reactionary "I like it"?

The relationship between design and the words we use to communicate design is one of interdependence, with each enhancing and reinforcing the other. In the same way we take the time to look for better design executions, we must also intentionally look for more nuanced words to describe our work and the problems we want to solve. If not, we risk recycling the same patterns at the cost of innovation.

2014 Conferences

$
0
0

Viget has always funded and supported conference attendance for all staff. The idea is to support the professional growth of all our staff by ensuring a chance to share hard-earned knowledge in a public forum, learn even more, and meet some talented peers.

But how can we cut through the hype to identify which conferences are truly worth attending? If you take their descriptions at face value, most conferences come just shy of offering a route to infinity and beyond:

“A place to learn from world-changing thinkers and innovators for the creative community.” —Circles 2014

“Cutting-edge learning and inspiration.” —Future of Web Design 2014

“No heroes, just people hungry for tectonic shifts in thinking and doing.” —Greenville Grok 2014 (Also, allegedly, there will be race cars.)

Amid all the hoopla, you kind of have to admire JSConf’s no-nonsense approach: “Conferences for the JavaScript community.” Got it.

The fact is that, when a conference has been truly valuable, we can all tell. Our fellow Vigets come back and swap stories, share enthusiastic write-ups internally, and share blog posts externally. That kind of response helps us all benefit from the event, even if we didn’t attend ourselves.

To help nurture such knowledge sharing, we asked around internally which conferences we should all have on our radar for 2014, and here’s the list that came back.

SXSW — March 7-11 in Austin, TX. We’ve sent a contingent into the throng for many years. Check out our recap series here (food recs included). Large and wide-ranging, SXSW has something for everyone and is worth experiencing at least once, or umpteen times.

IA Summit 2014 — March 26-30 in San Diego, CA. This year's theme is "The Path Ahead." Celebrating its fifteenth year, the conference will ask speakers not just to reflect on the tremendous progress in UX since its inception, but to look forward to what's next.

Owner Camp #005 — March 26-28 in Portland, OR.  This is a small, invite-only event for agency owners that runs twice per year.  Brian, our CEO, attended #003 last year and will be back again.  Expertly hosted by Greg Hoy and Greg Storey at the Bureau of Digital Affairs.

RailsConf 2014 — April 22-25 in Chicago, IL.  This is still the largest Ruby on Rails event in the world.

Re:Design/UXD — April 28-29 in Brooklyn, NY. This event series explores a particular theme, in this case “UX design.” Our team has found that the inclusive, small-scale discussions with industry leaders are a valuable chance to trade ideas and make meaningful connections.

Google I/O — May 2014 in San Francisco, CA.  Started in 2008 and focused on developers, the "I" and "O" stand for input/output, and "Innovation in the Open."

ConvergeSE — May 1-3 in Columbia, SC.  Hosted by Gene, Jay, and Giovanni of Unmatchedstyle for “everyone working with technology in creative ways.”  Our own front-end developer Dan Tello spoke at ConvergeRVA last year and just might be on the speaker list for ConvergeSE 2014.

JSConf 2014 — May 28-30 in Amelia Island, FL. We're fans because JSConf manages to be both deeply technical and deeply supportive of community. In its sixth year, the event still feels intimate and continues to define conversation around the (mind-blowing) possibilities of JS.

GIANT Conference — June 11-14, in Charleston, SC. A rad conference about creating rad experiences (for web, print, retail, or branding) and how to make those experiences even radder. Among this year's speakers: Dan Tello (yes, mentioned above—he’s on a roll). Definitely pretty rad.

An Event Apart, DC — multiple two-day events in multiple locations throughout the US; this year's Washington DC event is set for July 21-23. Our Falls Church folks have been attending the DC event for years because we've found that it's consistently well-organized, with very high-quality speakers and content. We’re sure to be back yet again.

Circles — Sept 18-19 in (or near) Dallas, TX. An outstanding opportunity to hear from speakers known for their knock-out portfolios and unique career paths. Our team walked away with long lists of takeaways, inspirational stories, quotes (“Instinct is just as important as intellect (but a bit harder to sell to clients).” -- Matt Stevens), and new friends in our industry. Bonus: if you can't make it, all talks are available on video.

World Maker Faire — September 20 - 21 in New York, NY.  This "festival of invention, creativity and resourcefulness, and a celebration of the Maker movement" got the most "so cool" responses from our developer team, who are increasingly, well, making things.

BlendConf — 2014 dates/location are TBD. Last year, BlendConf held its first-ever event in Charlotte, and our own Designer Mindy Wagner was one of the speakers. What stood out most? The event was remarkably well-organized, included a great balance of male and female speakers, and a "no gadgets rule" for all talks created a positive social dynamic. We hear there may be rumblings of a BlendConf South America in the works!

Google Analytics Summit — 2014 date/location are TBD (most likely late spring/early summer in Mountain View, CA.) Our team attends every year because it’s a chance for us, as a GA Partner, to learn about new GA features and tools, as well as chat directly with their creators.

Peers Conf — 2014 dates/location are TBD, but last year's event struck a nice balance between tech stuff (like coding workshops on Craft and Statamic, which have both caught our team's attention) and business stuff (like time allocation and work/life balance).

In addition to these national conferences, we love joining (even hosting) smaller local events, especially where we have offices (DC, Durham, and Boulder).  What events are you planning to attend this year?

Viewing all 1272 articles
Browse latest View live