Quantcast
Channel: Viget Articles
Viewing all 1271 articles
Browse latest View live

Making Infield Form Labels Suck Less

$
0
0

Let me start off by saying you really shouldn’t put form labels—or even placeholder text—inside of form fields if you want to be safe. But we can’t always play it safe. Sometimes putting labels inside of form fields is the best option we’ve got. Jeremy Fields, Steve Schoeffel, and I found ourselves making that decision on a recent project, and we set out to make the best of a tricky usability situation.

Why Shouldn’t I Put Labels Inside Of Form Fields?

There are a number of usability issues with putting labels inside of form fields especially if they’re not implemented well. From a usability perspective, we see:

  • Text inside the field can get mixed with user input if it’s not removed from the field.
  • It turns out that many users won’t enter text into a field, if they see text inside of it.
  • The purpose of the field is obscured when the label is removed, forcing the user to rely on short-term memory to remember what they need to enter.

If—like we did—you’ve found that infield form labels are your best option given the project requirements, there are some ways to mitigate these usability issues. UX Movement has a good checklist:

  • Group related fields (e.g. addresses, credit card information)
  • Clearly differentiate labels from user input
  • Provide good visual feedback

We made sure to address each of these, but weren’t completely happy with the result. In particular, we thought we could do more to help users recall the purpose of each field once the field was active and text was being entered.

Fixing Infield Form Label Visibility

The simplest solution to the problem of disappearing form labels is to make sure they don’t actually disappear once the form field is active. But if you’re going to keep the field labels around, you need to figure out where to put them. We played with several approaches, weighing the pros and cons of each.

Labels slide outside of the fields

Field label appears to the left of the form field

Pros:

  • Labels are visually consistent inside and outside of the form field.

Cons:

  • Only really works when you can move labels in a direction where they won’t end up inside another form field. This generally limits you to moving the labels to the left or right of the form field.

Example:

Labels appear next to fields as tooltips

Field label appears above form field as tooltip

Pros:

  • Reuses a common design pattern (tooltips) to present form labels so that labels are visually distinct from other form elements.

Cons:

  • Can obscure adjacent form fields and other form elements depending on where you place the tooltip. Keeping the tooltips small can minimize this problem.

A note on positioning your field label: If your solution relies on moving the field label outside of the input, make sure there’s somewhere for it to go. On small screens a solution that moves labels to the left or right could end up positioning the label outside the browser’s viewport.

Example:

Swap label position from left to right (or right to left)

Field label moves to the right side of the form field

Pros:

  • Keeps the label inside the field and doesn’t obscure any other form fields or form elements.

Cons:

  • While it avoids other form elements, the label can get in the way of user input. In particular, there’s nowhere for the label to go in a short field (e.g. ZIP code) without overlapping user input.

Example:

Our Solution

We placed the label above the field as a tooltip

We ended up using the tooltip approach, placing labels above their input once the input has focus. We liked this approach because the active input labels are clearly distinct from other form elements, and the same approach can be used when the design scales down to smaller screens. We’d prefer not to obscure the form elements above the active input, but this approach is all about compromises.

Interested in how we implemented this solution? Jeremy has a great writeup of the details.


Making Infield Form Labels Suck Less II

$
0
0

Hopefully you’ve already read Jackson Fox’s post on Making Infield Form Labels Suck Less from a UX perspective. If you haven’t, I recommend that you check it out before reading my thoughts from the front-end development perspective.

Can't wait to check out the code? Head down to the jsFiddle at the end of the post.

So often in web design and development, things that are easy to implement aren’t appropriately examined. In this case, placing the label for a text field within the field is a common practice to make form layouts more compact. The implications of that choice create interaction and technical challenges that need to be considered carefully.

Since Jackson covered usability issues with this approach, I want to discuss some of the technical and accessibility considerations. Trevor covered this a few years ago, and while the browser landscape has changed quite a bit, it’s still a good read on the subject. My issue with the popular techniques is more semantic than technical. There are a bunch of ways to get text into a text field to serve as a label, but most of these techniques only solve it visually. Let’s take a look at the two most popular.

Value Attribute

One of the most popular implementations of this pattern is to use the value attribute of the text field for the label. JavaScript is then used to remove the value when the field is either focused or typing begins. This method is full of issues, including:

  • When JavaScript fails or is unavailable, the interaction breaks. Either the value isn’t set at all leaving no label (worse) or the user has to remove the label before they can enter their information (annoying) and the label is gone forever if they forget what the field is for.
  • Extra care must be taken by the developer to ensure that values for fields not filled in by the user aren't sent along to the server when the form is submitted.

The most problematic part of this method, though, is that the value attribute does not provide proper accessibility for users navigating with a keyboard or screen reader. According to WebAIM’s article on Creating Accessible Forms:

When a screen reader accesses a form item that has a <label> element associated with it, it will read the text within the <label> element and indicate the type of form item it is (e.g., "First Name. Text box" or "Age. Check box").

Using anything other than a <label> creates extra work, at best, and confusion, at worst, for users that have vision or mobility impairments.

Placeholder Attribute

The HTML5 placeholder attribute seems to be the perfect native solution to the problem. According to caniuse.com, the placeholder now has over 68% support among browsers. That makes it a much more viable option than when Trevor wrote his article. The problem with the placeholder is that it’s not an alternative to the label. The W3C puts it very bluntly:

The placeholder attribute should not be used as an alternative to a label.

This issue is described in great detail by Roger Johansson on his blog 456 Berea St.

The placeholder is also an accessibility can of worms. From low visual contrast to no reference once a field has been focused or filled in, placeholders have lots of issues.

Solution

To solve this problem and make the infield label pattern suck a little less, Jackson and I came up with a list of requirements:

  • The label needed to be visible while the user was filling out that field.
  • The placement of the label needed to work within the layout of the form and page.
  • It had to use the <label> tag to ensure good accessibility and semantics.
  • It had to be useable if JavaScript is not available.

What we came up with wasn’t revolutionary. A lot of smart people have headed in this direction before. Instead, our solution was an iteration toward a cleaner and less obtrusive implementation.

The Code

The JavaScript is in the form of a jQuery plugin so it can be easily dropped into any project and bound to any text inputs currently on the page or if they're added to the DOM later. The goal was to keep it very simple and leverage the native events provided by the browser.

For example, when a <label> is correctly set up with a for attribute that matches the id attribute on an input field, clicking on the label will automatically bring focus to the input. Because of that, the focus and blur events on the input only need to be bound.

For the CSS, a .js class is being set on the <html> or <body> to determine if JavaScript is available. Using that class, the <label> is positioned on top of the input if JavaScript is available or above as a fallback if it isn't.

Play around with the jsFiddle below or head over to GitHub and download the code.

New Takes on the Ol’ Comment Section

$
0
0

Medium & Branch

Comment sections are almost all essentially the same. Very rarely do you see someone come up with a novel approach. Medium, however, has very thoughtfully done just this and it’s great. When I was reading this article the other month, I saw that the author had also posted it into Branch for further discussion. I thought it was interesting to see these two discussions go on in parallel. It made me realize that both sites, Medium and Branch, are presenting new ways to discuss and comment online. It made me wonder if anyone else is doing anything interesting related to comments. I found a few.

Medium

Medium's Comment Sidebar

Medium allows commenting on each paragraph so there can be mini-discussions based on particular points. This way the comments are more contextual. It’s an innovative approach that just makes sense. In order to add a comment (only if you’re signed in), you just hover over the paragraph and click on the comment icon that appears in the right sidebar. You can also highlight specific text and add your comment that way. Comments are hidden by default so this means you have to manually toggle them open to view them. Because of this, it’s smart that Medium provides a way to link to a specific comment on the page which will take you to that location and then slide open the sidebar column.

Medium Page Bottom

Given this approach, one of the implications is that there aren’t any comments at the bottom. My take: awesome – the bottom of the page is clean! And now it can be used for elegantly previewing the next article, as Medium does (see above). The one thing that’s potentially missing here is the sense of overall reactions to the argument or idea of an article. The bottom of the page does seem like a logical place for this but then you risk confusing the user by having comments in both places. Maybe it would work to add some sort of dedicated space at the end of the article but still hidden in the right sidebar where the other comments are?

Branch

Branch Discussion

Branch is a slightly different concept because the commenting is the content; it’s a forum for discussion. It’s essentially one long threaded comment. Despite this difference, I think we can still glean some good ideas from what they’re doing. For instance, they have a Top Highlights feature for summarizing strong points (bubbled to the very top of the thread and expandable on click). These are user-curated and implemented in the form of anchor links that take you to that particular place in the conversation. Branch’s discussion thread functions in linear fashion like a normal conversation would. Each comment is added to the bottom. There isn’t opportunity for sub-threads or going back up to reply to older comments.

Branch Top Highlights

One of the distinctive features of Branch is that you can only comment once you have been invited and added to the conversation. The person who initiates the conversation adds people to begin with and then can add additional people along the way (possibly others in the conversation can add people as well?). Otherwise, you can’t join, but you can read along. In this way, the conversations are more intentional but also more limited. It seems like a reasonable feature add-on would be a button that notifies the conversation initiator that you’d like to join. You can obviously do this by other means but this action is so germane to the site’s primary activity that it seems like it would be worth considering.

The Verge

The Verge Comment Keyboard Shortcuts

The Verge’s comment section has keyboard shortcuts for power users. Now this is a pretty cool idea. It seems especially appropriate given that The Verge has a strong base of dedicated users who are actively involved and are generally more tech savvy. Also, popular posts can have well over 1,000 comments – so the feature isn’t totally unwarranted. My one gripe is the fact that these shortcuts only work if you’re signed in… but they don’t tell you that! So for most people coming to the site, the shortcuts just appear broken! Definitely a cool concept. I’d be curious to know whether people use this feature at all. It’s integrated into all three of Vox Media’s sites (including Polygon and SB Nation).

Cognition Blog

Cognition Responses

The Cognition blog doesn’t have any traditional comments* but allows for Twitter and blog responses. Some people are averse to traditional commenting sections and props to the folks at Happy Cog for trying out something unique. This is certainly the least trafficked of the examples here so in a way, they can get away with it. After all, you really don’t have to have comments at all if you don’t want to. There’s a potential bonus in this case that by pushing people to respond via Twitter or their own blog, you’re widening the impact and visibility of the original post. At the same time, it feels a bit selective in that you have to tweet or blog to respond and you may not want to do either… in which case you don’t… and the discussion that might’ve happened doesn’t. And also, Twitter is definitely not the best place for a discussion. Perhaps the thought was that these responses would instead be more isolated reactions and thus the section at the bottom more an area for consolidating these. It’s an interesting concept that seems to have upsides and downsides.

[*Update: As of 6/19, it appears the Cognition blog has switched to Disqus! Funny timing.]

Cognition Using Disqus

Gawker Network

Gizmodo Comments

Gizmodo and Lifehacker (and other Gawker network sites) get a brief mention because their comments are laid out in two columns with more of a tile approach. Replies to these comments are just appended to that comment’s tile and the result seems to be a less linear presentation. To me, it tends to feel a little disorganized but it is slightly different than your typical comment thread. They also offer photo annotations that appear when you hover over the image. This concept is more contextual like the Medium comments but I worry that they become more of a nuisance than anything else.  

Disqus

Viget Disqus

If you’re going to go standard, you may as well do it nicely. Disqus has a number of solid features (upvoting, filtering, a community tab etc.), is easy to implement and has a clean visual style. It’s what we’re using on this blog. There are a few other similar services too but from what I've seen, Disqus seems like it's the best.

Pushing Further

A theme that seems to run through these examples is one that is relevant to the way most decisions should be made when building a site – that is, implement what is most useful and appropriate to the users of your site. There isn’t necessarily one solution that is automatically the best. Nor is the most barebones solution always the answer, even though almost everyone does it. Hopefully we continue to see more sites emerge that creatively reimagine the commenting experience and push online discussions further in the process.

Tips for Making Multi-User QA More Efficient

$
0
0

As a project manager with a focus on custom development projects, I do a lot of quality assurance testing. While our developers use various automated testing approaches to ensure code is well-designed and working correctly (along with pull requests before merging code, to maintain code quality), I manually test all user-facing functionality before turning over a given feature to a client or to users.

Those custom dev projects come with a recurring special treat: multiple user roles to test! Sometimes lots of them! Sometimes with bonus complex workflows involving three or more users doing specific things in sequence! Whee!

Testing with multiple users and user roles (e.g. admin, editor, logged-out user) can quickly become a nightmare. Here are three strategies for making this kind of testing more manageable and more efficient.

Gmail Aliases + Simple Naming Convention

There are two main barriers to efficiency when testing with multiple users (assuming email address and name are required to create an account).

The first is logistical: How do you efficiently create a unique email address for potentially dozens of test accounts? I used to create new Yahoo or Hotmail accounts for each test user; filling out forms and repeatedly stepping through confirmation workflows slowed my testing considerably.

The second is organizational: How do you easily come up with and keep track of the local part of the email address and a name for each test user, without wasting time and causing confusion? Like: I just created my 17th test user but need to go back and test with the third user — wait, what email address did I use for User No. 3?

Now I use Gmail aliases and a simple naming convention to bust through both barriers. A quick explanation about Gmail aliases from the good folks at the Googs (what, you don't call them "the Googs?"):

You can receive messages sent to your.username+any.alias@gmail.com. For example, messages sent to jane.doe+notes@gmail.com are delivered to jane.doe@gmail.com

I use a simple incrementing pattern to create multiple users with multiple gmail aliases: josh.korr+1@viget.com, josh.korr+2@viget.com, etc. If I'm testing with multiple roles and multiple users within each role, I'll do something like josh.korr+admin1, josh.korr+admin2, josh.korr+editor1, josh.korr+editor2, etc. (Or josh.korr+ad1 and josh.korr+ed1 to keep things even shorter.)

That takes care of the email account time-suck and half of the naming problem. To solve the rest of the naming problem, I use a simple naming pattern like John1 Tester, John2 Tester, Admin1 Tester, Admin2 Tester.

Combine these names with the email address pattern and it's super-easy to create and keep track of multiple test users.

Testing Permissions

If an app has multiple user roles, the app by definition has a "permissions layer." From an external QA perspective, this is logic that determines:

  1. Which user roles can view a given page (we think of these as "view permissions")
  2. Which content or interactions should be hidden/shown for certain user roles on a given view ("inline permissions")

Keeping track of the permissions logic becomes difficult if there are more than, say, two user roles. To help track the permissions and test efficiently, I create a spreadsheet for view permissions logic and one for inline permissions logic. I list all pages in the app and all user roles, and detail each role's permissions for each page. My craziest permissions spreadsheet: nine user roles to test across about 50 pages. 

I still test discrete permissions functionality throughout a project when a given feature is completed. But spreadsheets like this make it much easier to retest the entire permissions layer once it's fully implemented.

Testing Complex Workflows

Permissions aren't the only tricky thing to test in apps with multiple user roles. I've been extra-lucky to face multiple complex, twisty workflows that require testing with multiple users in specific sequences and with multiple branching logic paths. As with permissions, there's a point at which it's impossible to keep that straight in my head and still feel confident I'm testing rigorously. In these cases, I whip up another spreadsheet to write a QA script beforehand.

In one section, I outline all the user roles I'll need for the particular test. Then I note the actual test accounts that I'll use for each role, creating new ones if needed.

In a separate section, I outline the granular steps I'll need to take for the entire test. (The linked spreadsheet template is artificially truncated; in reality there could be eight steps to "As josh.korr+role1, complete and submit assessment.") I like to color code the user role cells in the left section, and color code the corresponding cells in the script section to denote when I need to switch to a different test user.

This is definitely overkill for routine QA. But I find that for these complex flows, it's helpful to plan out the test beforehand. This ensures that I cover every possible piece of the flow, and makes it easy to pinpoint a specific failing step and repeat the test later if needed (both key for writing good bug reports).

Now let's hear your tips for multi-user QA!


How to Pass the Google Analytics IQ Test in Two Days: Zero to Hero

$
0
0

I am going to tell you how to study for and pass the Google Analytics Individual Qualification (GAIQ) test in two days. But, why should you listen to me? I’m just a lowly intern, right? Not only did I manage to go from zero GAIQ experience to passing the test with 94% in two days, but I also spent 3 years as a professional ACT instructor at a leading test prep company.

The GAIQ is a valuable certification that absolutely always results in multiple job offers, Oscar nominations, and your old boss begging to have you back. Failure results in … we won’t get into that because failure is not an option. 

So, what will this post help you accomplish? After reading my tips, you will be more confident, more successful, and have better abs. But, most importantly, you will be able to pass the GAIQ exam and apply the skills you have learned to benefit your organization and yourself. Let’s get started. 

Test Overview
The GAIQ test is 90 minutes and 70 questions long, consisting of both multiple choice and True/False questions. You need to answer at least 56 questions correctly to pass (80% and above is passing). Thankfully, once you begin the test, you can pause it any time and return to finish it within 48 hours of when you began.

Preparation
First and foremost, go to Google Analytics IQ Lessons and watch all of the videos. These are Google’s test prep videos and the best resources to start with. Pause the videos and take notes. The pace of these videos is incredibly fast and, unless you stop to take notes, the majority of your time will be spent staring at a screen with a vacant expression while drool dribbles down your chin.

You’re done watching the videos? Whew. Now, go read Jens Sorensen’s blog post and internalize the information from the videos. I know someone who actually just kept this blog post open during the test and used Control+F to find the information she needed. Though it’s possible to pass the test this way, I still recommend reading through this post in its entirety as it bolsters your retention of the material in the GAIQ videos. Be prepared to take notes and pay attention, though, as it is an extremely long and detailed post.

Wake up! You fell asleep combing through that ridiculously long blog post. It’s time to humble yourself and do some practice problems that are much harder than the actual exam. Slingshot SEO has 20 questions you can download and practice. Do them. Then, check your answers, weep at your 50% score, and do them again to reinforce the knowledge you’ve gained thus far.

Ready to embarrass yourself further? Good. Go to this amazing site with more practice problems. Do as many as you are comfortable with; but, I suggest doing at least 20-30 to get a feel for the topics you will encounter during the exam. Once again, these problems are much harder than the actual exam. I did them until I was scoring in the 70% range while using minimal resources.

Resources for the Test
You are now as ready as you’ll ever be. But, before you get started, open up a second browser and get your resource tabs ready. Personally, I used Safari for my resource tabs and Google Chrome to take the test on, mainly so I wouldn’t accidentally close the test tab while looking up information. Here’s a screen shot of my resource tabs for reference. These tabs are vital because, during the test, you will have to look up multiple answers and having the resources open will prove invaluable in saving you time.

First, download this cheat sheet from Matt Gratt’s blog. Give it a quick read so you know what information is on it. Keep it open on your desktop or in a tab on your resource browser. Another useful cheat sheet is available from Blast Analytics & Marketing. I’ve found this guide to be more detailed than the previous one and referred to it more often during the exam.

Now, open up the Google Analytics Help Page, an actual Google Analytics account for a web site, the Google IP address range tool, Jens Sorensen’s blog, and, of course, Google on your resource browser.

Taking the Test
This is it, the moment you’ve been waiting for. Go to the test site in a separate browser and get started. Don’t panic, you’ve got this. You’ve been prepping for two days and you know this stuff backwards and forwards, especially if you’ve followed this guide. Go through and answer the easier questions first before you spend time on questions that require too much research or thinking. Write down the more difficult ones so that you can pause the test and look up the answers. When you’re finished, go back and check all of your answers one last time.

Now, hit submit and wait a few seconds to see your score. Congratulations! You have just taken your first GAIQ test and should be GAIQ certified, if not a veritable GAIQ god. Go add a shiny new line or logo to your resume and take a well-deserved break.

What Now
Now that you've passed the GAIQ test, you're ready to apply what you've learned. Here are a few additional resources to get you started on the right foot. These recommendations are courtesy of seasoned Google Analytics veteran Mitch Daniels.

If you have an e-commerce site, it's certainly worth tracking user transactions. Justin Cutroni published a series of helpful posts on the topic, and Google's official documentation will certainly come in handy.

Even if you don't have an e-commerce site, there are some key metrics that can provide you with great insight into your site's effectiveness. While it was written several years ago, this post by Avinash Kaushik provides some great recommendations for the goals and KPIs you should be tracking.

Congratulations, you are now well on your way to effective and valuable analysis.

Resources
Google Analytics IQ Lessons
Jens Sorensen Blog Post
Slingshot SEO Questions
Google Analytics Test Questions
Cheat Sheet by Matt Gratt
Blast Analytics & Marketing Cheat Sheet
Google Analytics Help Page
Google IP address range tool
Google
GAIQ Test Site
GA Tracking Code
Exclude Internal Traffic
Configure Site Search
Justin Cutroni Post
E-commerce Tracking
Avinash Kaushik Post
Tommy Griffith Post


Thanks
Thanks to all of the sites, companies, and blogs that I have mentioned in this post. Special thanks to Tommy Griffith as his blog was the most valuable resource I used when studying for the GAIQ test.
 

Envy Is An Asset

$
0
0

"Oh man, can you believe it's been four years since [Hank] joined the company?" I asked a co-worker the other day.

"Yep! God, remember how you were when he started?"

"I....no. What do you mean?"

"You were always talking about how much stuff he knew, how you'd never catch up, etc. — saying he'd put you out of a job."

"No, you're thinking of [Dean]. I know I did that when HE started."

"Hah, you did that with both of them, then."

"Huh. And now I always say that about-"

"Exactly!"

When your company works hard to attract and hire the smartest people possible, sooner or later you may find yourself with a co-worker who flat-out scares you. Maybe they have a strong background in something you're weak in, maybe they're an extraordinarily hard worker, maybe they talk over your head and confuse you. It might not even be a co-worker - it could just be someone you met at a conference, a meetup, or started following online.

This sort of upset to your self-percieved awesomeness can raise a lot of questions: Is this what everyone 'out there' is like? Are you out of touch, weak, softened by job security? Are you just (gulp) not good enough for this line of work?

For me, it leads to a period of ability anxiety; the feeling that I have to catch up, maybe spend a weekend learning the tool X was talking about on Friday, contribute to a big framework, write something in the hottest new language. It's easy to lose sight of what I love about my work in a mad, unsuccessful scramble to match so-and-so's toolkit of superior knowledge, ideas, and abilities.

But, as my opening dialogue hinted, the anxiety eventually melts away, and it's almost never because I bought a bunch of books and read some Node tutorials or whatever. After going through this process a few times as a designer, and now, several times as a developer, I've picked up a few tricks that help turn envy and intimidation into tools. Step one:

Admit it

If you meet someone who's a better illustrator than you, or a better programmer, or effortlessly creates perfect typographic layouts, for God's sake admit it to yourself. Tell other people how great they are. Retweet them. Don't balance it with "well, but I'm better at Z, so we're on equal footing" or "well, they're not working in an agency atmosphere" or some qualifying nonsense — enjoy the fact that you know, and have access to, someone with an admirable skill. When you're balled up in anxiety over your ability to do equivalent work, flat-out admitting that someone else is better can be a huge relief. It puts everything in perspective, re-aligns your mindset with reality, and moves you on to the next step.

Make friends with them

It's easy to be bitter, even unconsciously, towards someone who you feel threatens your self-image, or even (if you're paranoid) your job. Fight it, and be nice to them. One of the best favors you can do yourself is spending time with people who kick ass in some particular way that you do not.

Say "I don't know what that is."

This is the best discovery I made - when someone drops a JS framework, design pattern, or fancy art school term on you in casual conversation, just be brutally honest and say you don't know what it means, or that you haven't looked into it. I've wasted way too many conversations at conferences pretending I knew about some testing library because I'd read the top of the readme, when I could have just said, "I have no idea, please tell me what you mean." People love explaining things they know.

Steal from their process

At SXSW this year, I had the opportunity to see Tim Ferriss talk about his 4-Hour Chef experience, and one thing he said really stuck out for me. When Tim wanted to learn how to be as good as a renowned NYC chef, he said, roughly, "I knew I could never copy what he did: he was too good, and he'd spent a lifetime learning to do this. So I tried to learn his process." Ferriss investigated the things his subject did every day that enhanced and sharpened the skill, instead of fixating on the skill itself. It's a strong point that really stuck with me.

People with great ability have great process — they get up at the right time, focus on the right things, and they have their own little rules that work into everything they do. Great runners don't just run fast, they run regularly. Effective managers don't just manage people well, they manage their time well. The easiest thing to learn from an exceptional individual is how they organize and focus their resources.

What's more is, people with effective processes love talking about them. If a coworker always has an awesome premade lunch, ask how they manage to create it and still fit in other activities. If a developer submits a single-day pull request with a thousand lines of new code, ask them how they chunk tasks, how they think about overall problems, how they space out their email checking and feed reading. Every effective person has a process, and it's usually highly stealable. What's more, it exposes cracks in your own process where you might be losing time, focus, or just general happiness.

Afterthoughts

I've had enough conversations about envy anxiety to know that it's not unique to me - people naturally compare themselves to others and draw some amount of self-worth from the result. Is this something that's affected you? If so, how did the situation work out? I'd love to hear.

Boulder Meetup: Lessons From a Recent Redesign

$
0
0

It’s time again for the monthly Boulder Web Project Manager Meetup! On Tuesday evening, July 16th, we’ll be switching things up a bit by having our first presentation session. Josh Zapin, Director of eCommerce Operations at Crocs, will come to the Viget office in Boulder and walk us through the latest www.crocs.com redesign.

Josh has had extensive experience as a Project Manager at digital agencies, including 2 years as a Senior Integrated Producer at Crispin Porter + Bogusky. This experience on the agency side provided Josh with an interesting perspective throughout the www.crocs.com redesign which he will be sharing with us.

There will be pizza and beverages and a chance for mingling before and after the presentation. We hope to see you there!

Presentation Session: Lessons From a Recent Redesign

Who: All Project Managers in the Boulder and Denver area are invited!
What: A presentation on a recent redesign from Josh Zapin
When: July 16th, 6:00PM
Where: Viget Labs - Boulder
1360 Walnut Street, Suite 110
Boulder, Co (In the alley across from the bus terminal)

Interested in joining us? Please RSVP here!

Reflections:  4,800 Days at Viget

$
0
0

I recently began my fourteenth year at Viget.  It’s the longest I’ve ever worked anywhere -- and it’s not a path I’d foreseen when 5 of us were working on folding tables in my basement back in 2000.  In those days, at the height of the dot-com boom, I thought being part of a small company helping to build the Internet would be an exciting change of pace; but, if I’m honest, I didn’t see us lasting more than a couple years until we disbanded and went on to other things.  I’m glad I was wrong about that prediction.

In all these years, I’ve seen a lot of changes here at Viget; but, I’m most impressed by the things that haven’t changed.  Here’s just a sampling:

  • Talented people.  We started Viget with the idea that we would be very particular about those we hired.  We were tired of working places where teams were bloated with people who didn’t carry their own weight.  As anyone who works here can attest, our screening process can be daunting.  Phone screens, portfolio reviews, pair programming, written quizzes, whiteboard exercises, and formal presentations are par for the course.  End result:  I’m surrounded by awesomely talented experts in their fields.
  • Great benefits.  One of my first responsibilities was to line up insurance coverage.  It was me and four young, single guys who never went to the doctor.  They were concerned about building our first big web solution (an online catering system built on the LAMP technology stack).  I wanted to make sure that we had premium medical coverage because no one stays healthy forever.  Since the beginning, Viget has always paid 100% of our premiums.  Over the years, we’ve expanded Viget’s cost sharing to include 100% of family premiums and full funding of deductibles, in addition to adding a 401k plan with matching contributions, life & disability coverage at no cost, and, most recently, paternity leave.  Continual reevaluation of our benefits to ensure that our people and their families are taken care of remains a priority.
  • Enjoyable work environment.  I don’t just mean amenities like free soda, free lunches, casual dress, ping pong, and fun group activities like snowmobiling which have been constants since Day One.  Those are all nice and I’ve certainly enjoyed the free soda (by my calculation, 9,480 cans of Diet Coke, which is somewhat horrifying to admit).  One remarkable aspect about working at Viget is that we’ve managed to stay true to our “hire genuinely nice people” mantra.  Yes, we vet people’s skills, as noted above.  But, that’s not everything.  We want to work with people who are enjoyable to be around.  People who check their egos at the door; who graciously share their knowledge, time, and opinions with their peers; who care about others’ families, hobbies, and outside passions.  We all spend a lot of time at work -- at Viget, we choose to spend it among nice people.
  • Opportunities to learn.  Naturally, when we were small, we all wore multiple hats and we had to just figure out how to get stuff done.  Over the years, as we’ve grown to nearly 60 people, we’ve been able to become more specialized; however, that spirit of being willing to take on a project, responsibility, or technical challenge that may be new persists.  Our people are not only unfazed by obstacles in their path, they embrace those challenges.  I love that mind-set and I’m so proud to work with fellow go-getters.

My prediction now is that Viget will be around for another 5,000 days and beyond -- and will continue to remain unchanged in all the important ways.  I’m looking forward to it.


Join Us for Google Analytics 101 in Boulder, CO!

$
0
0

Hey there, Boulder! We love sharing knowledge at Viget. One way we do this is through the quarterly GA trainings we host at our Falls Church, VA office. We’ve found these to be fun for us and a valuable experience for participants. So, we’ve decided to expand our reach and share the love elsewhere. On August 15th, Marketing Strategist Paul Koch will finally bring the fun out west and will lead the first-ever GA training at our Boulder office!

During the full-day session, we’ll walk through the fundamentals of Google Analytics, dig into some of its most valuable features, and discuss how analytics can help you make the most of your online presence. By the end of the day you’ll know how to:

  • Slice and segment GA’s data to gain valuable insights about your users
  • Filter reports to understand what site content is most effective
  • Measure online (and offline!) campaign performance

If you’re interested in learning more, head on over to the event detail page or give us a call at 703.891.0670. Hope to see you there!

Ordering Lunch for a Large Group

$
0
0

Recently, I've been challenged to share more about how I approach my job as Viget's office manager. Inspired by my brilliant co-workers and their blogging powers, I am diving right in. I hope this post on large group lunch orders is useful. In the coming months, I'll write about booking travel and dealing with telemarketers. What other topics would you like to hear about?

One of the many perks of working at Viget is Free Lunch Friday (FLF). It’s an opportunity for everyone to come together and hear what's happening within the company across all the offices. Not only is it a welcomed break on Friday afternoons, but Brian and Andy treat us all to lunch!

Part of my job is to make sure there's enough food for 25+ hungry Vigets at our Falls Church office. Sometimes we order individual meals; but, with this many people, the chance for error is great, and it makes me sad if someone doesn't get exactly what they ordered.

When pickles end up on a pickle-hater's sandwich they be like ...

To avoid such doom and gloom, I try to order buffet-style lunches as frequently as possible. The group-lunch approach, however, comes with its own set of challenges. Here are the steps I take and the things I consider when ordering lunch for a large group.

Set a Budget

I cross-check our list of employees with the out-of-office calendar to determine the total number of people eating. Then, I multiply this number by $10 to get a rough budget to work within.

Questions to consider:

  • How many people are eating?
  • How much can I spend per person?
  • Are tax, tip, and delivery included in the budget?

Pick a Restaurant

Sometimes the budget dictates where I order from; but, usually, I stick to rotation from a list of favorite restaurants.  I try to alternate between cold lunches, such as deli sandwiches, and hot lunches, such as BBQ, to keep it exciting (although, I can’t think of a time when free lunch isn’t exciting).

Questions to consider:

  • Does the place deliver or does it require pick-up?
  • If it's pick-up, do I have time to go get it?
  • Am I switching it up enough? When was the last time I ordered from X restaurant?

Account for Appetites and Dietary Restrictions

What to order and how much to order is the trickiest part. I've ordered FLF weekly for over 3 years, so I've really come to know who is allergic to what, who hates breakfast for lunch, and who eats chicken but not beef. In the past, I’ve made the mistake of ordering just enough of a vegetarian option for vegetarians, not expecting that non-vegetarians would also eat the vegetarian option. To give you a better idea of how much food to order, I've included 3 examples of our recent orders at the end of this post.

Questions to consider:

  • Are there men or women with big appetites?
  • Is anyone a vegetarian or vegan?
  • Is anyone allergic to nuts? Gluten?

Order and Receive the Food

I try to place the order 24-48 hours in advance so the restaurant has plenty of time to prepare. If it's delivery, I make sure to state that we plan to eat at noon which means the food should arrive before then, but not too early if it is to be served hot. If it's a pick-up order, I give myself plenty of time to get there, grab the food (which usually is never ready), drive back, and set up. When I pick up the food or it arrives, I always have a list of what I ordered and I check the food to make sure it’s correct and that nothing is missing.

Questions to consider:

  • Am I able to pick the food up? If not, can I send someone else?
  • If pick-up, can I pay ahead of time over the phone? This way, I can get the food and go.
  • If delivery, is there a fee? Does that fee go to the driver?
  • Will I need plates, napkins, utensils?

Solicit Feedback

If we try a new restaurant, I send a feedback form with 3 quick questions:

  • What did you think? Scale 1-5
  • Why did you give this score?
  • Do you have a suggestion for a new place?

Filling it out is optional and anonymous. With a group of 25+, there will undoubtedly be people who love the restaurant and people who hate it. The point of the survey is to sift through the extremists and figure out how the majority feel.

Take Notes

I often find this part tedious and think to myself, "surely I will remember this next time." But, I never remember and I'm always thankful I have notes. I don’t provide a full recap, just quick notes of how the lunch went. Then, when I order from the same restaurant again, I refer back to my notes and makes adjustments to my order accordingly. When I began taking notes, I really started to learn about the group and their preferences.

Questions to consider:

  • What was left over?
  • What was all gone?
  • What was popular and went really fast?
  • Was it delivered or ready (if pick-up) on time?

When I first started ordering lunch for a large group, it was stressful and time-consuming -- but, now, it's become easy and fun. I'm always looking for ways to improve my process, so let me know if you have any comments or suggestions. How do you deal with ordering lunch for a large group?

Bonus Features

Template:

To keep things organized, I save everything in a spreadsheet similar to this template. Each week, I add a new tab so I can easily refer back to my notes from previous orders.

Example Orders:

Below are some recent orders I’ve made for our group of 27-30 people (4-6 vegetarians), consisting of mostly young males with big appetites.

Noodles and Company Square Bowls (I ask for all the protein to be served in separate bowls to make all the options vegetarian-friendly.)

  • 2 Mac & Cheese with Parmesan Chicken
  • 2 Penne Rosa with steak
  • 1 Pesto Cavatappi with tofu
  • 1 Japanese Pan Noodles with Parmesan Chicken
  • 1 Pad Thai with tofu
  • 2 Caesar salads with chicken
  • 12 Rice Krispie treats

Red Hot and Blue

  • 3 lbs of pulled pork
  • 3 lbs of beef brisket
  • 3 lbs of smoked sausage
  • 1 mini vegetable wraps tray
  • 1 ½ pans of mac & cheese
  • 1 mini fruit tray
  • 2 qts of BBQ beans
  • 2 qts of potato salad
  • 1 qt of banana pudding

District Taco

  • 10 veggie tacos
  • 25 Pollo Asado tacos
  • 25 Barbacoa tacos
  • 30 Al Pastor tacos
  • shredded cheese, lettuce, pico de gallo, and salsas
  • 2 bowls of guacamole + chips
  • sour cream (purchased separately from the grocery store)

Tips for ordering pizza:

  • Assume women will eat ~3 pieces and men will eat ~4 pieces
  • Order roughly 40% vegetarian and 60% with meat
  • Cheese and pepperoni are easy and safe choices
  • If you're ordering for a group you're unfamiliar with, avoid mushrooms, olives, and anchovies.
  • If it's a large party, ask that the pizzas be cut into smaller square pieces (party cut).

Refresh Boulder, It’s Real and It’s Happening! Thursday, August 22nd

$
0
0

We at Viget are a sociable bunch. We love getting out from behind the warm glow of our laptop screens and having some real life facetime with our peers. Local meetups are a chance to match the twitter avatar to a real face.

We also love Refresh. We've been actively involved in Refresh DC and Refresh the Triangle for years. So when we opened the Boulder office in 2010 and designers and developers started to migrate west to Colorado, there was much sadness at the lack of a regular Refresh meetup close to home. The Boulder design community is growing and thriving, with meetups like Caffeinated MorningsDesign Hour, and UX Book Club. We want to help it continue to grow and flourish. Bringing Refresh to Boulder seems like a great next step. Its manifesto addresses what we want for our local community: 

Let's Gather Great Minds
Let's Share All Of Our Knowledge
Let's All Grow And Learn
Let's Promote Local Talent
Let's Be More Than We Think Can Be
Let's Make Our Cities Better

On Thursday, August 22, we're kicking off the very first Refresh Boulder event! Our own Laura will start the event off with a presentation about overcoming collaboration challenges. From the Eventbrite description:

At its best, collaboration throughout the design and development process generates stronger ideas and better work.  At its worst, collaboration is an expensive way to waste time. 

Competing interests, remote teams, tight timelines, and ambiguous action items are common hurdles to successful collaboration at interactive agencies. This month, Laura Sweltz, a User Experience Designer at Viget, will discuss these challenges and share ideas for how you can lead the charge towards better collaboration within your organization.


Afterwards we'll grab some drinks and food at Lazy Dog. Find out all the details and RSVP on our Eventbrite page. Hope we'll see you there! And follow us on Twitter @RefreshBoulder to keep up to date on news and other upcoming events. 


We'd love to make Refresh Boulder a true communal effort. Please get in touch if you have any interest in hosting an event, presenting and sharing some knowledge of your own, sponsoring an event with some pizza and beverage-based sustenance, or even just to share some ideas or feedback!

Building Client Trust: Part 1

$
0
0

When Tom polled the Viget team recently to see what makes for the most satisfying projects, trust from the client came in as the third most critical factor.

With it being so important for us (and I'm sure many agencies and freelancers alike), I took some time out to think on it a little more. How do we frame trust, what are its challenges in a business/client setting, and what are we doing to gain or lose trust?

Framing Trust

To think about trust in a business setting correctly, we have to first remember what trust really is. It's far far far from a signature on a contract. Just a handful of the most simple observations and quotes quickly show that we're dealing with a high-maintenance concept here (and high maintenance is often bad news in business speak):

1. Trust is powerful, yet fragile

I'll start letting my guard down when people stop giving me reasons to keep it up.”

2. Trust is not given, but earned

It takes years to build up trust, and it only takes suspicion, not proof, to destroy it.”

3. Trust is rarely fast-tracked

Trust is built over time, can't be forced and has to be seeded and nurtured and given time to grow.”

Framing Mistrust

If trust is so fragile and high maintenance, mistrust must generally be the human default. Some basic social/psychological research tells us that's absolutely true:

1. Communication creates vulnerability

A serious down side of communication is that it opens the door for deception.”

2. Lying is common

Lying is more prevalent (and more expected) than we think. The average person lies about something every day.”

3. People are naturally skeptical

The human brain has powerful mechanisms for searching out and finding complex and hidden causes.”

4. Preconceived notions are hard to change

Once we have accepted a belief, we have a host of cognitive mechanisms designed to bias us against rejecting it.”

5. We're built to be on alert

The mind is designed like a smoke detector, set to go on red alert at any possible sign of threat in the environment.”

6. Stress breeds mistrust

People in downtrodden situations are more prone to mistrust. Our brains turn up the volume on our danger systems when we are under distress or threat.”

Here's the Thing

If we're not careful, we'll consciously know trust is important but subconsciously shrug off the challenge and the effort it takes.

What I've thought before:

  • Everything Viget does contributes to building trust. If we communicate well, present well, and deliver well, we'll be trusted. I mean, just look at our portfolio and track record.
  • If a client doesn't trust us, it must be due to their conservatism, naivety, personality or circumstance. There's just not a lot we can do with those.

While there may be some truth in those thoughts, man are they scary. They're full of passivity and excuse, and there's definitely a healthier outlook.

What I'll be trying to think more:

  • Most clients are under some type of distress, and for good reason (reread 1-6 above). If they don't already have internal mandates and conflicts they're facing, hiring an agency equates to exposure to risk, financial concerns, loss of control, political battles, etc. We should be ready to be mistrusted and questioned, and we should be ready to work through it. And we shouldn't take it so personally. It's often more about the distress than it is about us.
  • It isn't wise, as any agency of any caliber, to assume that our reputation precedes us and that we should naturally be trusted. There is always a lot to prove.

The Discrepancy and Challenge

What trust asks of us (long timelines to slowly build and nurture) is pretty counter to what we're working with (short timelines to quickly execute and deliver). It's not an easy job to rectify this discrepancy, but in Part 2, I'll start sharing some of the obvious and less obvious ways we're thinking and working to bridge this gap. In the meantime, work on your resiliency. It's an important part of working with clients as well.

Reflections on An Event Apart DC 2013

$
0
0

This week, Trevor and I attended An Event Apart DC, the annual design conference roadshow organized by Eric Meyer and Jeffrey Zeldman. Past AEAs were must-see events and this year's conference was no exception.

One of the things I love about An Event Apart is that, while each speaker presents on their own topic, common themes pervade the entire event. The conference functions as a cohesive full-length album rather than a collection of hit singles; more "Pet Sounds" than "Surfin' Safari."

This year's conference touched on many common themes, but the three that stuck with me the most are the importance of iteration, content-first design, and progressive enhancement.

The Importance of Iteration

Several speakers drove home the importance of iteration, both in design and development. In his kickoff presentation, Jeffrey Zeldman remarked that agencies should include post-launch iteration phases in their contracts. Far too often, he argues, we design products, launch them, and then fail to revisit our creations in the following weeks and months.

Speaking at the atomic level, Samantha Warren remarked that it's much easier to iterate on a style tile than it is to iterate on a fully-realized composition. This point ties in nicely with Brad Frost's recent push toward Atomic Design and the increasingly pervasive notion that we should be designing patterns and systems instead of pages. In fact, Jeremy Keith shared his Pattern Primer describing it as "unit tests for your CSS."

Content-First Design

Last year's popular content-first (or "content-out") design returned in force again this year, with Karen McGrane making strong arguments for the value of a multi-device content strategy. Karen spoke of how good content transcends platform: "There's no such thing as 'How to Write for Mobile.' There's just good writing."

With the ascension of the Multi-Device Web, we must now take a long, hard look at our content strategy. We should never think, "We can just hide this content on mobile." Instead, we should be asking ourselves, "Do we even need this content?"

Several speakers noted that, in the near-future, all phones will be smartphones. That means people of all economic walks of life will be accessing the Internet from small(ish) devices on a variety of connections and service plans. For many of these people, this device will be the only way they access the Internet. It is therefore critical that your website be designed in a way that lets these users accomplish their desired tasks. Technically speaking, this means building a high-performance, progressively-enhanced, mobile-first responsive design.

Progressive Enhancement is Still Important

Speaking of our old friend Progressive Enhancement… Throughout his presentation on The Long Web, Jeremy Keith reminded us all of the importance of progressively enhanced experiences. That is: build your website using HTML and CSS first then enhance that experience responsibly with JavaScript.

Progressive enhancement was never really about trying to cater to users with JavaScript disabled. Instead, progressive enhancement is about expecting the unexpected. The problem with building a JavaScript-reliant website is that JavaScript is a single point of failure.

HTML and CSS have a simple yet brilliant error-handling model: when the browser encounters a bit of markup or a CSS property that it doesn't understand, it simply skips that markup or property and moves on to the next thing. JavaScript, on the other hand, breaks when the interpreter encounters an error. Building progressively-enhanced websites safeguards your work against the possibility of broken JavaScript. Your fancy AJAX-powered escalators will simply become stairs.

Building mobile-first, responsive, progressively-enhanced websites is a winning strategy as far as I'm concerned.

Wrapping Up

The above is just the tip of the iceberg. An Event Apart DC 2013 may be over, but there are plenty more valuable pieces of knowledge to consider and fold into our thought processes in the coming year. If you're interested in reading more about the event, I've posted all of my session notes for your perusal.

Why You Should Start Your UX Career at an Agency

$
0
0

When I started looking for my first job as a user experience designer, I was brand new to the field, but eager to learn and grow as fast as I could.  I was seeking a company that would provide a positive learning environment, but where I could also make real contributions from day one.

There are plenty of avenues for UX designers.  Agencies, in-house design teams, and product companies all provide their own unique environments, benefits, and challenges.  Ultimately, I chose to start my career at an agency.

Looking back, I feel confident that I made the right choice.  I jumped right in and learned on the job, yet I always had support from my more seasoned team members.  I have worked with talented individuals from across all disciplines of the web design and development process, and I’ve gained experience with big brands, non-profits, educational institutions, and start-ups.  All of these components have made me stronger, not only as a UX designer, but also as a professional.

I think starting a career as a UX designer at an agency is an advantageous choice for others as well.  Here’s why:

You gain experience quickly.

At an agency, you’re thrown into the deep end, which forces you to learn your craft quickly.  I can’t imagine a better way to build your skill set than by working on real projects.  The great part about an agency, though, is that you’re surrounded by skilled practitioners with extensive experience who can support and guide you.  The chance to rise to a challenge while still having a safety net is critical for new designers. 

You learn a broad range of skills.

I won’t speak for all agencies, but at Viget UX designers are generalists.  Being a generalist is a great opportunity, particularly when you’re just starting out.  On a single project, you may work on a competitive analysis, a content audit, user research, information architecture, interaction design, and testing.  Exposure to the wide range of activities that live under the umbrella of UX allows you to broaden your skill set and expertise while learning how to create and present a variety of deliverables.  More importantly, you learn your strengths and weaknesses, as well as the areas that interest you the most. 

You work with a variety of clients.

One of the main benefits of working at an agency is variety.  Rather than focusing on a single company or product, you work directly with a range of clients and you are exposed to even more through your co-workers’ projects.  No two projects are alike so there is a continual opportunity to solve new problems and apply your skills in different ways. 

You receive solid mentorship.

Agencies attract some of the most talented designers in the industry.  Learning alongside designers whose work you respect and who provide solid mentorship is essential to becoming a successful UX designer.  Exposure to their work will inspire and influence your own work, and they will consistently push your work to new levels.


The opportunity to gain such a wide range of experience while working with talented designers makes agencies a great place to start a UX career.  You can learn which aspects of UX interest you the most and what types of companies and projects you like working on.  After working at an agency for a couple of years, you will have a strong set of generalist UX skills and a comprehensive portfolio.  If the agency life doesn’t turn out to be for you, you’re in a great position to take those skills to an in-house design team or product company.

For those just starting out and looking for the right place to launch their career, I wish you the best of luck.  Need inspiration?  From personal experience, I can recommend taking a look at the UX Designer position at Viget.

Breaking the Konami Code: Adding an Easter Egg to Your Site

$
0
0

If you’re a video-gamer, you’ve probably heard of the Konami Code. First used in video game company Konami’s 1986 release of Gradius for the Nintendo Entertainment System, the Konami Code is a sequence of button inputs used as a cheat code trigger.

By entering the combination of "↑ ↑ ↓ ↓ ← → ← → B A," gamers could trigger cheat codes ranging from an increase in lives to unlocking special in-game items.

The original button combination for the Konami Code

On the Web

Almost thirty years later, the Konami Code idea still exists in video games and has also moved to the web where it is often implemented on websites to reveal secret inside jokes or hidden messages known as Easter Eggs. By typing in certain codes -- whether the original Konami Code or some sort of other password -- users can reveal these Easter Eggs.

How does it work?

Most often, a website uses simple JavaScript code to capture the keystrokes input by the user. Once the user has input the code (within a set timeframe) the code triggers a function to activate the Easter Egg.

Just recently, I added a special sort of Konami Code to the Viget Intern Tumblr. Just go to the site and type “mario” for a little surprise. I find that this sort of Easter Egg is a delightful surprise when playing around with a website.

Implementation

Thanks to a simple jsfiddle I found while searching Stack Overflow, I was able to create a jQuery function to interpret user keystrokes and reveal Mario and his world. Check it out below:

//’secret’ specifies the numerical keystrokes that make up the word “mario”
var secret = "7765827379"; 
var input = "";
var timer;

//The following function sets a timer that checks for user input. You can change the variation in how long the user has to input by changing the number in ‘setTimeout.’ In this case, it’s set for 500 milliseconds or ½ second.
$(document).keyup(function(e) {
   input += e.which;    
   clearTimeout(timer);
   timer = setTimeout(function() { input = ""; }, 500);
   check_input();
});

//Once the time is up, this function is run to see if the user’s input is the same as the secret code
function check_input() {
    if(input == secret) {
        //the code used to reveal mario and the world is then put here           
    }
};

Site Examples

You can head to Konami Code Sites to find a list of sites implementing the not-so-secret code. Note that some may not work as their source code may have changed since being listed.

Also, here are a couple more sites with their corresponding codes for you to try out (working as of 8-7-13):

Viget Interns 2013 Tumblr

Intern Tumblr Mario Style

I thought I'd spice up the Viget Intern 2013 Tumblr with a Mario themed easter egg. Watch as Mario run as you scroll, and jump when you hit "j".

Code: "mario"

British Vogue

British Vogue Veloceraptor

Fancy a hat-wearing velociraptor? The British Vogue site has got you covered.

Code: "↑ ↑ ↓ ↓ ← → ← → B A"

Digg

Digg.com features an extra special RickRoll with their Konami Code Easter Egg.

Code: "↑ ↑ ↓ ↓ ← → ← → B A"


Have you found any clever Konami Code Easter Eggs out there on the web? Leave them in the comments below!


The All New QuarkGames.com

$
0
0

A Bold Site for a Bold New Game

Quark Games is a tablet and mobile gaming company founded in 2008, with an emphasis on creating innovative and engaging gameplay experiences. Quark approached Viget as it was preparing to launch its brand new tablet game, Champs: Battlegrounds. With the launch of their flagship game around the corner, they needed a strong web presence to tell its story.

A New, Addictive Game

Champs: Battlegrounds is a multi-player strategy game with a twist: players take their turns in real-time (no waiting for the other player to go), creating a fast-paced, engaging, and addictive experience. In order to prepare for designing the new website, we were given access to the Champs: Battlegrounds Beta, and as someone who barely made it past playing Mario Bros. as a kid, I was surprised at how fast I was hooked. With this in mind, we knew we needed to create a site that hooked prospective players immediately.

Designing Tablet and Mobile First

We presented the client with bold yet simplistic designs that really let the amazing artwork from Champs: Battlegrounds shine. Quark Games has done such an amazing job with the character and gameplay graphics that we focused on complementing them rather than competing with them. We also took the tablet and mobile game theme to heart. Most users will likely be viewing the site from a tablet or be familiar with mobile interactions, so why not design specifically for that view? What we came up with was large, easily clickable buttons in any view, as well as a default collapsed menu for all views, even desktop. This gives the site a consistent look and consistent navigation for all devices.

Creating a Site That's Accessible From Anywhere

Design was only half the story here, though. The team still needed to develop the site to be responsive across all devices. While faithfully translating the design, we paid special attention to how it would look - and perform - on different devices and network conditions. Beyond utilizing common responsive techniques, the team took things a step further by serving images at various qualities based on a user’s bandwidth. This ensures the beautiful retina graphics do not negatively impact quality for users with lower bandwidth. The end result is an entertaining site that can be easily, and quickly, viewed on any device.

A Platform to Allow Easy Updates

We used ExpressionEngine as our platform, which gives Quark Games all the flexibility they need to manage and update their site on a consistent basis. With ExpressionEngine, the client was able to manage images, news, and game highlights with an intuitive and annotated interface.

A Successful Outcome

The all-star team we had, combined with a client who was willing to push the envelope a bit and try new things, led to a site we are proud to have worked on. The project was a lot of fun, the guys over at Quark Games were amazing to work with, and we look forward to hearing the reactions they get to their new site!

Take a look at QuarkGames.com and let us know what you think!


Behind the Scenes: Building Proofessor

$
0
0

What happens when you take a group of college-aged interns and tell them they can create anything they want? A booze app.

Last year's interns created an awesome interactive storybook remake of Jack and the Beanstalk. This year, each Viget office had enough interns to create their own individual projects. At HQ, our ideas ranged from campaigns for non-profits, to a website for a local restaurant, to geolocation scavenger hunt games. There was a lot of debate over the topic, but ultimately, like any good group of college students, we unanimously agreed to create a practical mixology app called Proofessor.

What's Proofessor?

Basically, the way it works is, you open the site and select what spirits, liquors, or mixers you have available and would like to use. Then, the available recipe list filters down to fit your selected parameters and you can click on different recipe names to learn how to make them. If you're indecisive like me, you can simply shake your mobile device, and Proofessor will flip to a random recipe for you. The site is responsive and works on both desktop and mobile, though it is intended to be used as a web app on a device's home screen.

Setting Up a Virtual Host

One pretty cool trick I learned here was how to set up a virtual hosting environment. This means that instead of going to localhost, i could label the host url anything (professor.dev is what I used for the app and in the example below) and, with a server running, could access the site by going to that url (professor.dev) in a browser window.

You must first add it to your hosts file (located at your computers root directory /etc/hosts and add this line:

127.0.0.1 proofessor.dev

before these lines:

255.255.255.255 broadcasthost
::1 localhost
fe80::1%lo0 localhost

** Note: for some reason, editing this file in Sublime Text on my computer caused a slew of issues as invisible characters were created (this basically created a huge error and I lost access to everything -- big ups to Lawson for realizing this was the problem and fixing it).

Then, in the httpd configuration file in your Apache Server (I'm using MAMP, so mine is located at Applications/MAMP/conf/apache/httpd.conf), add these lines to the end:

<VirtualHost *:80>
  DocumentRoot /Users/Una/Sites/proofessor/public
  ServerName proofessor.dev
  ServerAlias "proofessor.dev.*.*.*.*.xip.io"
</VirtualHost>

This will enable the professor.dev virtual host on your system. The server alias, with all of the *'s, allows any person/device on the same wifi network to access the site as well using a service called xip.io by 37Signals. Replace the *'s with the wifi ip address address of your computer (this may change for each wifi session) which can be found in your system's preferences (and is different than you COMPUTER's ip address - so don't try going to findmyip.com). Then use that number instead of *'s to access the site. I.e. proofessor.dev.10.0.0.10.xip.io would be the link.

Anybody who is on the same wifi connection can now access your website from any device. This is how my teammates were able to upload recipes to the database at the same time as I worked on the buildout -- all possible via a CMS that I set up before the design of Proodessor was finalized. I must admit, it was pretty awesome to be working on the code for this web app and watch the recipe count slowly increase.

Choosing a CMS

The CMS that Proofessor is built on is called Craft. Developed by Pixel and Tonic, version 1 was released on June 4th of this year, just a few days before my internship began (perfect timing!) Nobody at Viget had any prior experience with this specific CMS (because, well, its brand new), but Trevor introduced it to the team in a lab share, and we decided that Proofessor could be a great opportunity to try it out.

I thought that the learning curve would be relatively steep, but I'm pleasantly surprised with how intuitive and user-friendly Craft turned out to be. Content is organized by sections of entries, which have custom field sets of user-specified fields. Individual bits of information are entered into the fields. Entries can be cross-referenced (i.e. the ingredients here are a different type of entry with an image asset, yet I can access these image assets by selecting ingredients inside of Recipes). It sounds a little confusing, but once you start using it, you get the hang of it pretty quickly. Here's an example of how ingredients and recipes look in the back-end:

You can then access these variables in the layout via the field's slug and by using Twig, the tempting agent that Craft uses. Curly bracket syntax is used within content blocks to insert field entries from Craft.

  • {% %} = functions
  • {{ }} = variables
  • {# #} = comments

This reads from the table above to represent the list of ingredients in the Recipe entry view:

{% for row in entry.specificingredient %}
  <li class="specific-ingredient">
    {{ row.ammount }} {{ row.unit }} {{ row.ingredientName }}
  </li>
{% endfor %}

It's also possible to access these variables in ANY view by specifying what section of entries you are looking for ('recipes' in this case). This is how the titles of all recipes showed up on the index page:

<ul class="recipe-list">
  {% for entry in craft.entries.section('recipes').order('title').limit(200).find() %}
    <li class="single-recipe-block">
      <a class="{% for ingredient in entry.ingredients %} {{ ingredient.slug }} {% endfor %}" href="{{ entry.url }}">
        {{ entry.title }}
      </a>
    </li>
  {% endfor %}
</ul>

Using Craft was really a joy; the small, growing community (and its developers themselves) were extremely supportive throughout the process.

All of the Javascripts

Writing the javascript to make the app actually run/function/work/do things was absolutely the most difficult part of the process for me. I went into this without much javascript development experience, and was confused by namespacing, event binding, and scope. Tommy had a really fun time explaining the "this" keyword in different contexts without actually using the word "this" in his explanation (which was hilarious because "this relates to this" is what anyone would initially want to say -- so props on some creative speech twists to avoid it).

I used this basic structure for all of my javascript files:

window.PROOF || (PROOF = {}); //define a namespace (only ONCE) -- I used PROOF for Proofessor

(function($, window, document, undefined) {
  var _common = PROOF.common = { //this is your js object
    init: function() {
    this.setVars();
    this.bindEvents();
  },

  setVars: function() {
    // set all variables here
    this.helloString = "hello" ; // also _common.helloString
  },

  bindEvents: function() {
    // set event listeners for your functions here
  },

  // the rest of your functions go here

  _common.init(); // don't forget to init!
})(jQuery, window, document);

Be a Defender of Simplicity

This is something Ryan, one of the developers here, said at our all-hands summer meeting (TTT). He called developers the "defenders of simplicity" in a project's lifespan. That really stuck with me. To understand the complexity of a request, and make decisions on whether it is worth it or not, is an important skill and an important part of the process. Saying 'no' to something is definitely not necessarily a bad thing.

There were a lot of opinions and concepts for this project, and debates ranged from changing the accent color to adding music to animating almost every little thing on the page. Clearly, you can't have it all or there will just be a jumbled mess. We had to nix some features (such as favorites and an Instagram feed, among other things) and animations (there was just so much going on already when we actually saw it all together!) in the interest of time and sanity.

One of the things that got cut very last minute (it was even there when the app was initially released!) was a countdown that visually showed the numbers filtering up or down as the number of available recipes changed. This one was a feature I was particularly proud of because it was the first javascript function I wrote from a base conceptual/algorithmic level (without help!). However, the filtering was slowing down the site, and caused problems with the recipe count, and we got some negative feedback on its impact on mobile speed. Ultimately, removing this feature did make a noticeable speed performance upgrade on mobile.

Proofessor.co is now live and ready for action! Download it to your phone's home screen or just open it in your browser, and enjoy!

Hidden Complexities of a Simple Idea: The Making of CrushCoverCut

$
0
0

This summer at Viget's Durham office, I had the opportunity to work on a group project with an absolute dream team of rockstar interns: Curt Arledge for UX, Corwin Harrell for design, and Sid Reddy for rails dev. As the FED intern of the group, many of my tasks required me to interact closely with the intern from each lab, so I felt lucky to be amidst such talent.

After much indecisiveness about what to make, our group finally settled on building CrushCoverCut, a rock paper scissors Ruby on Rails web app. The intent was to create a 2-player game that mimicked the real-life gameplay of RPS as much as possible. Our vision was clear: something simple, lightweight, slick, and stylish. We didn't want to mess with the rules or revolutionize the game; we just wanted to do one thing really really well.

My thoughts at this stage: Awesome. Doable. Let's start.

Not So Simple After All

But, as it goes with most things in life, behind the apparent simplicity of our idea lay a host of hidden complexities. As I dug in deeper, a gazillion unanticipated issues seemed to emerge on the front end. Many of these complexities arose from two major aspects of our application: the need to maintain state across clients and a particular animation that had to occur when the two players' choices were revealed. They were the most challenging, but also the most interesting problems that I had to tackle.

The Pains of Integration and Refactoring (and the Joys in the Aftermath)

In the planning phase of our project, we had decided to make our web app a realtime 2-player game, justifying its feasibility by throwing around words like "websockets" and not really thinking about how much work would actually go into crafting a realtime app. In the end, we didn't even use websockets at all; Sid and I eventually used long polling AJAX requests to enable communication between the server and client. This turned out to be a great learning experience, albeit quite complicated.

Deferreds and Promises: A Newfound Love

Perhaps my favorite takeaway from this was learning about jQuery Deferreds and Promises. A Promise, in my own crude and unscientific understanding, is an object that you can return from an asynchronous function that essentially keeps track of the state of that asynchronous task. Promises begin as Deferreds, which are just Promises that you can resolve or reject. The point is, a Promise is useful because it allows you to bind callbacks to it that will only fire after it has been resolved or rejected, which allows you to hold onto something in the meantime while the actual task finishes executing, and makes sure that you only use the outcome of that task once you know it has been completed. Bonus: Super awesome example of recursion + Promises by Nate

In my case, Deferreds/Promises came in handy when I polled for match and player data to determine if both players were ready to play. First, I created a Deferred object to which I attached a callback that would advance the state of the app to begin the match. Then, inside my polling function, I would resolve this Deferred after a request returned that both players were ready. As a result, that callback from earlier would fire automatically, both players would be guaranteed to be ready at this point, the screen would advance, and all would be dandy.

If You Can't Learn It in Time, Fake It

In order to hook up the communication between the backend and front end in a seamless manner, I also needed a way to keep track of changes to the states of particular objects stored in the database like the match and the two players (and amongst them, the current player for each client), and then update elements on the screen accordingly. Initially, my entire setup was one huge, impossible-to-manage jQuery soup. It was too late to switch to Backbone.js and to have to learn all the ins and outs of a new library, but Backbone wizard Nate helped me restructure my app with my own homemade pseudo-Backbone models and views using EventEmitter2.

Aside from instantiating individual models for each player and the match, some neat things I got to implement -- also suggested by the Backbone wizard -- were a "state machine" model that would emit different change events depending on which screen state got set, and a parallel "director" view that would listen to these state changes and render the various templates associated with each state. This arrangement gave me an easy way to control the different screens in the app and to show them whenever I needed. I pared down my setup to a more simplified example that I illustrate here:

//State Machine model
var StateMachine = Model.extend({
  setState: function(state) {
    for (var key in this.attributes) {
      if (key !== state) {
        //first set all other states to false
        this.attributes[key] = false;
      } else {
        this.attributes[key] = true;
        this.onChange(key);
      }
    }
  },

  onChange: function(state) {
    this.emit('change:' + state, this);
  }
});

//Director view
var Director = View.extend({
  //listens, .on(change:X) -> render X
  init: function() {
    this.model.on('change:lobbyState', 
      this.renderLobby.bind(this));
    ...
  },

  renderLobby: function() {
    var data = {};
    var markup = this.templateLobby(data);

    //Cached element
    this.ui.$panel.html(markup);

    this.controllerLobby.init();
  },
  ...
});

var stateMachine = new StateMachine({
  lobbyState: false,
  ...
});

var director = new Director({
  model: stateMachine,
  el: window.document.body,

  templateLobby: HandlebarsTemplates['lobby/main'],
  controllerLobby: 'lobby',
  ...
});

Navigating the backend code and maintaining this channel of communication between clients was a new and quickly overwhelming challenge for me. Ultimately, and despite all the headaches, I'm glad I took the time to refactor my code midway through to respect this MVC design pattern. The experience taught me the great value in separating data from the user interface, and also probably saved me from drowning in my would-be soupy code further down the line.

The Longest Three Seconds Ever

I also faced huge challenges on the more front-end side of the front-end development, one of them being recreating a beautiful 3 second animation that Corwin had simulated with Adobe After Effects. There were a lot of moving parts, literally, with 18 hexagonal pieces flying into the screen at varying times with motion blur. How does one even begin to tackle something like this? By consulting her brilliant advisors of course. My all-star mentors, Jeremy and Nate, gave me some invaluable tips to approaching the animation. First, they helped me break the problem down into more manageable, discrete steps: Create a rough prototype on CodePen, just as a proof of concept type thing. Start with animating boxes, or divs with just a background color, and start with only a few. Give each box its own attributes like durations and delays. Read about requestAnimationFrame, but use setTimeouts for now. Basically, test the waters, show that a simplified version can be done, and don't make it into a huge ordeal upfront. Sage advice, mentors.

Remembering High School Math

One of the coolest solutions that Nate suggested to me was using an inverted parabola with CSS blur filters to model the motion blur. As a front-end developer, the point, he said, is not to get the physics 100% right all the time, but to simulate it in such a way that the end product looks cool, as if it really is behaving like the real thing. What a motion blur looks like is essentially a small amount of blur towards the beginning of the movement, more blur in the middle, and no blur when it stops. Because the tiles in my animation were sliding in horizontally from both sides, I could plug in these changing x-values into an equation for a parabola, and use the y-value to proportionally determine the amount of blur at each step. After momentarily forgetting how to write a quadratic function, I recalled some basic algebra knowledge from way back when and simulated this on CodePen: http://codepen.io/notajingoist/pen/zwsoJ.

Achieving Pixel Perfection (Almost)

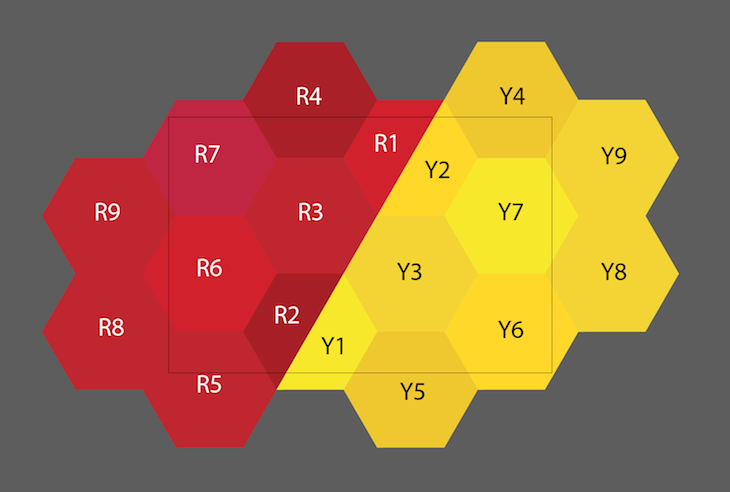
After the prototyping phase, I moved on to constructing the actual animation. Corwin provided me with a labeled visual of the tiles and a corresponding list of tile frame numbers.

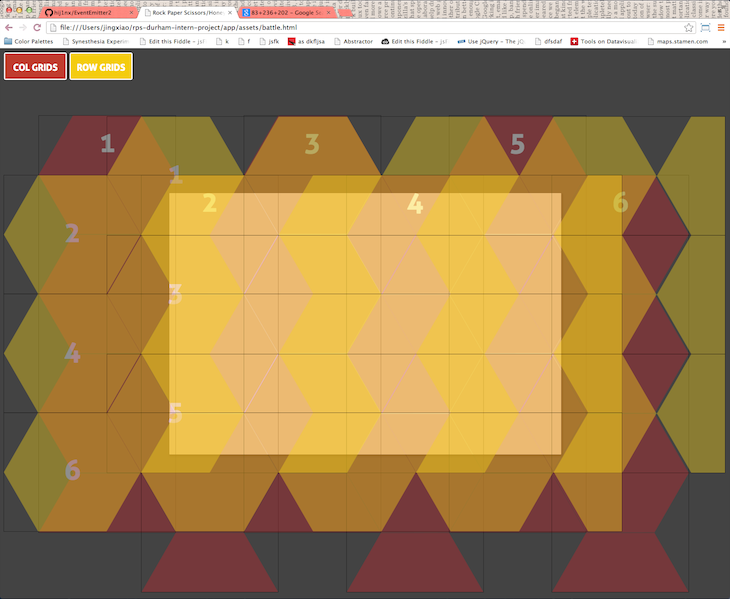
Instantly, I knew that positioning each tile in the animation individually would be hell if I didn't have a plan. My approach was to create a visual grid system by setting the background of one div to the image of a single hexagon tile and repeating it horizontally and vertically. This way, I could guesstimate the pixel positions one time for the grid using just a blank canvas, and have a convenient frame of reference that I could show and hide at my whim to more easily guesstimate the positions of each of the 18 tiles.

With these end positions and my prototype from earlier, the rest of the task magically didn't seem so hard anymore. Timing was simply a matter of some elementary-level math, and setting the background images for each of the 54 different hexagon images (3 item choices * 18 tiles) on their corresponding classes was easily done by writing some SASS mixins. I hooked up the animation to the rest of the app, wrote some code that would swap out the classes on each tile's div based on the players' choices, and voilà, a fully functional animation. The 3 seconds of pain were over.

This whole process was certainly somewhat overwrought, but it did eventually lead to a decent imitation of the original After Effects video. I can't say that this was the best approach, nor would I recommend that others move pixels for a living as I did for those few days, but I do endorse starting small and building up, maintaining an eye for detail, and keeping an attitude of persistence throughout the struggle.

After the Blood, Sweat, and Tears

Who would have thought that rock paper scissors, the simplest game of them all, could end up being so complex? In spite of the challenges (or maybe because of them), working on this group project has been one of the most rewarding experiences I've ever had. For me, this project served as a great introduction to a number of different technologies that I had never worked with before, and thanks to both my amazing team members and my genius, selfless advisors, this journey has been pretty darn extraordinary.

Finally, check out the fruits of our summer's labor at www.crushcovercut.com! (We recommend you use Chrome or Safari.)

My Boulder Summer at Viget

$
0
0

Starting at Viget

When Viget notified me that I would be a summer 2013 intern at its Boulder, Colorado office, I was incredibly excited. I was also plenty nervous since I had never lived more than two hours from home before. It didn't even seem real to me until I was cramming 10 weeks worth of items into two suitcases and getting ready to go to the airport. In retrospect, I had nothing to be nervous about. When I arrived at Viget the staff was friendly, welcoming, and just as professional as you'd expect from a company that's so well-respected within the industry. I came into my internship with a solid foundation in front end development and I'm leaving with a wealth of new knowledge in the area.

The success of my learning experience is due in no small part to both Doug Avery and Jeremy Fields—my two advisors for the internship. When I couldn't get a div positioned where I needed it, they were there to help. Couldn't figure out how to work with paths in an SVG image? There to help. Couldn't figure out what I was doing because I had written hundreds of lines of code with no comments? There to help—and more importantly, to teach. They weren't the kind of advisors who would sit down, fix my code, and then walk away. They were the kind of advisors who would sit down, explain why my code wasn't working and how I could make it better, and then walk away. Even when the 'how to make it better' was just 'leave some comments once in a while.'

The Group Project

I'm coming out of this internship a much better web developer than I was when I came into it and you can't ask for much more than that when it comes to summer internships. While at Viget, I worked on three different projects. The biggest was a team project with the three Boulder Viget interns. Will, Alex, and I made a Ruby on Rails-based “rock, paper, scissors, shoot” game called Battle of the Hands. This is the project that took up the bulk of my time at Viget. I marked up the designs I was given, experimented with animations, and even got to make a power bar for the two fighters (A.K.A hands) using Javascript.

The Personal Projects

My two personal projects were very different. The first one involved marking up a responsive landing page for a fictional website. This was a great learning experience. I enjoyed getting to call some of the design shots when faced with the challenge of where to place elements when a user is on a mobile device. I also got to make a carousel from scratch using CSS3 animations and even use HammerJS to make its interactions touch-accessible on mobile devices.

My second personal project was more flexible in terms of what I could do, so I chose to incorporate a topic that had fascinated me from the day I arrived in Colorado: the wildfires. My first day in Boulder, my mom and I took a drive up Flagstaff Mountain on the outskirts of town. About 20 minutes into our drive, we saw the charred remains of an area of the mountain that looked like it had been burnt down a year or two ago. A few weeks into my internship, I read an article that listed the most destructive wildfires in Colorado history and how much damage they had done. I wondered where these fires were all located and decided that I wanted to take this information and give it a visual representation. Thus began my second personal project.

I purchased an SVG map of the state with each county outlined and did research about the causes of each individual fire. Although the article didn't list the causes, I thought that they were an important—if not the most important—piece of information in relation to the fires. As amazing as the fires are, they're also terrifying and horribly destructive. If somebody playing with my map sees that a huge, destructive fire was caused by somebody throwing away a lit cigarette, maybe it could cause them to think twice before doing that. My interactive map can be found here.

Wrapping Things Up

Much like my coming to Colorado didn't seem like it was actually happening, my departure feels equally surreal. I'm incredibly grateful to Viget for giving me this opportunity to learn, explore a new region, and grow as a person. I'm excited to see my family and friends, but I'm also sad to see my time here end. I know I'll always look back on this summer as one of my favorites. Thank you to Viget for playing such a large role in that.

Taking Epic Portraits - It’s All About the Light

$
0
0

When a client photo shoot gets scheduled, we take the opportunity to rent the best gear for the job (whether we’re shooting shoes, wallets, or babies). One of our recent shoots required super sharp close-up shots with a shallow depth of field. So we rented the following equipment for our ideal setup:

  • Canon 5D Mark III
  • Canon 100mm f/2.8L IS Macro Lens
  • Canon 580EX II
  • Westcott 26’’ Octa Rapid Box

The Canon 100mm Macro is notoriously Canon’s sharpest lens, even with the aperture wide open, so we knew it was the right tool for the job.

The great joy of renting gear is that we normally get to do a test run the day before to make sure everything is working properly. This particular setup gave me the idea of playing with epic portraits. So we took a couple hours, set up the gear, and captured some shots. (Click any of the pictures in this post to view the fullsize images to see just how sharp they are.)

We used a white backdrop, with the 580EX II (remote triggered) in the Westcott softbox at a downward ~60 degree angle, pointing from about 3 feet behind the subject at the back side of their face (when shooting profiles). The subject would sit in a stool about 5 feet in front of the backdrop to give enough room for the flash.

The key to this shot is the light. Having the strobe come from behind the subject at an angle creates a sharp outline of the face with deep and interesting shadows. It also compliments the sharpness of the 100mm macro nicely as you can catch almost every little detail of the face and hair. You can play around by moving the light to different locations and seeing the effect it has on the shot.

Thanks to Owen, Elliott, Anjali, Saad, Joseph, and Minh for being my fearless and hilarious stand-ins. Check out the full Flickr set.

Viewing all 1271 articles
Browse latest View live